


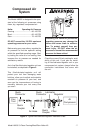


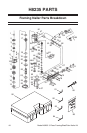


Model H8235 3-Piece Framing/Brad/Palm Nailer Kit
-11-
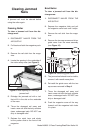
Depending on the type of stock and nails
you are using, it may be necessary to
adjust the depth of nail penetration for your
framing nailer.
To adjust the depth for your framing
nailer:
1. DISCONNECT NAILER FROM THE
AIR SUPPLY!
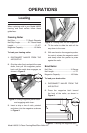
2. Use a 4mm hex wrench to loosen the
cap screw shown in Figure 8.
3. Move the safety nose away from the
nailer body to decrease nail depth, and
toward the nailer body to increase nail
depth.
Adjusting Framing
Nailer Depth
4. Re-tighten the cap screw, then connect
the nailer to the air supply and test the
nail depth.
5. Repeat Steps 2–4, if necessary, until
the nail depth is satisfactory.
Figure 8. Loosening cap screw for depth
adjustment.
Safety Nose
Cap Screw
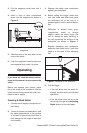
Palm Nailer
1. Connect the air supply to the quick con-
nect fitting.
2. Make sure your free hand and other
body parts are positioned out of the
way of a potential path of a nail in case
of deflection.
3. Hold the nail firmly in place with one
hand as if using a regular hammer.
4. Place the tip of the palm nailer over
the top of the nail. When the ram pin
touches the nail head, the nailer will
automatically begin to hammer the nail
into place.
5. Hold the nailer in place until the sliding
depth guide is completely depressed
up into the nailer and the nail is fully
hammered into the workpiece.
Note: You can stop the nailer at any
time by simply lifting it away from
the nail. This is useful if you do not
want to countersink the nail into the
workpiece.
If the nailer is allowed to continue
hammering until it stops by itself, it will
countersink the nail to an approximate
depth of 2mm or
5
⁄64".
DO NOT attempt to adjust the depth on
your brad nailer. The nose of the brad
nailer is not designed to be adjusted.
Doing so could cause the safety nose
mechanism to malfunction and cause
personal injury.