


-10-
Model T10432 (Mfg. Since 11/10)
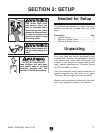
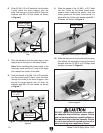
6. Slide (2) M8-1.25 x 25 hex bolts into the table
T-slots, place the fence support over the
bolts, then secure it in place with (2) 8mm flat
washers and M8-1.25 star knobs, as shown
in Figure 6.
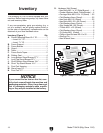
7. Peel the adhesive from the scale tapes, then
apply them to the tops of the fence boards.
Note: When installing the fence boards in the
next step, make sure the 0" ends of the tapes
are nearest the center of the table.
8. Slide the heads of (4) M8-1.25 x 25 hex bolts
into the fence board T-slots, insert the bolts
through the holes in the fence support, then
secure the fence boards with (4) 8mm flat
washers and M8-1.25 star knobs, as shown
in Figure 7.
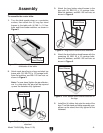
9. Slide the heads of the (2) M6-1 x 25 T-bolts
into the T-slots on the fence board faces,
position them towards the center, slide the
router guard over the bolts, then secure it in
place with the (2) 6mm flat washers and M6-1
tri-knobs, as shown in Figure 8.
10. Slide the dust port onto the dust port housing,
then attach the assembly to rear of the fence
support with the (2) M5-.8 x 55 Phillips head
screws, as shown in Figure 9.
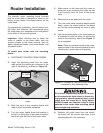
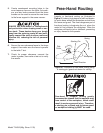
DO NOT operate the attached router without
an adequate dust collection system. Follow
your router manufacturer's specifications for
the required dust collection capacity. Failure
to use a dust collection system can result in
short and long-term respiratory illness.
Figure 6. Fence support attached to the table
top.
Fence Support
Mounting T-Slots
Star Knobs
Figure 7. Fence boards secured to the fence
support.
Fence Board
(1 of 2)
Fence Board
Star Knob
Scale
Tape
Figure 8. Router guard installed.
Router Guard
Figure 9. Dust port assembly attached to the
fence support.
x 2