


Page 2
About this Guide
The information in this guide has been carefully
checked and is believed to be accurate. However,
Hach Ultra assumes no responsibility for any
inaccuracies that may be contained in this guide.
In no event will Hach Ultra be liable for direct,
indirect, special, incidental, or consequential
damages resulting from any defect or omission in
this guide, even if advised of the possibility of
such damages. In the interest of continued
product development, Hach Ultra reserves the
right to make improvements in this guide and the
products it describes at any time, without notice or
obligation.
Before Taking Measurements
IMPORTANT: Before taking any measurements,
please ensure that the conditions of use
correspond to the certification of the instrument
and the installation was performed as described
in the Operator’s Manual.
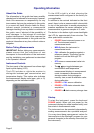
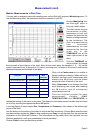
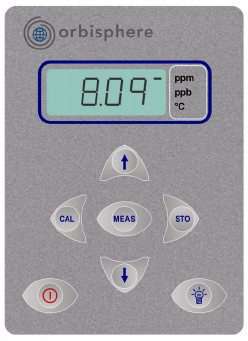
Instrument Controls
The front panel of the instrument has a three-digit
liquid crystal display (LCD).
The LCD includes a right-side marker to
distinguish between gas concentration and
temperature display. This marker also indicates
the measurement display units (ppm, ppb, or %)
depending on the instrument model.
To the LCD's right is a label showing the
measurement units configured at the factory for
your application.
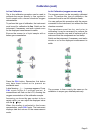
In addition to the controls indicated on the front
panel, there is also a pressure relief valve switch
on top of the instrument to enable atmospheric
pressure equilibrium for sensor calibration, or for
measurements in gaseous samples in % units.
The button in the bottom right corner backlights
the LCD for approximately three minutes. The
other push-button controls are:
• POWER turns instrument power on or
off. The instrument starts in
measurement mode
• MEAS places the instrument in
measurement mode
• CAL calibrates the analyzer against a
reference sample. This button can be
locked out from the WinLog97 PC
program
• STO stores a measurement value into
memory
• The × Ø keys toggle between gas
concentration and temperature
measurement displays in measurement
mode, increases or decreases the
storage number during storage or
memory view, or sets a calibration value
during calibration
• POWER + CAL sensor calibration
• POWER + STO starts automatic data
acquisition.
• POWER + × starts memory storage view
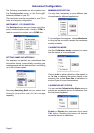
Startup
To start the instrument, press the keyboard
POWER switch. When you turn power on, the
instrument displays its model number briefly, and
then starts in measurement mode.
The instrument can be operated independently,
making measurements as a portable analyzer.
You may store these measurement values for
later analysis via the WinLog97 program (on your
personal computer) or the memory view mode (on
the instrument).
Operating Information