Page 8
BAROMETRIC PRESSURE SENSOR
The instrument internal barometric pressure
sensor is calibrated at the factory, and normally
requires no further attention. However, you may
wish to calibrate it against your own
instrumentation, or simply check the instrument
for accuracy.
Select Troubleshooting, Pressure Calibration
from the WinLog97 program, and enter the
current atmospheric pressure, in mbars, in the
calibration pressure entry box.
GAS SENSOR
The sensor can be calibrated either in air or
directly in line in a liquid sample. Additionally,
oxygen sensors can be calibrated using a span
gas.
To perform a calibration, you must first choose
which method you wish to use. The mode of
calibration may be selected using the WinLog97
program. Alternatively, you can select the mode
of calibration using the instrument front panel
buttons.
Switch the instrument power OFF. Switch the
instrument on by holding down the CAL button,
and then pressing the POWER button at the same
time. The instrument display will show either Air
for in air calibration, LI for in line calibration, or
SPA for span gas calibration
Use the × Ø buttons to change the mode to your
choice and press the STO button to set the
selected mode.
In a Span Gas Calibration
The span gas calibration procedure may be used
if you have a source of gas with a known
concentration of O
2
(in% units). To perform this
type of calibration, the instrument must be set for
calibration In a Span Gas. The Windows
WinLog97 program must also be used in this
procedure.
Switch on the instrument, if
necessary, and wait a minute or
so for the displayed
measurement to settle. Then
expose the sensor to a span gas
sample with a known oxygen
concentration. Enter the
percentage of oxygen in the
span gas using the WinLog97
program.
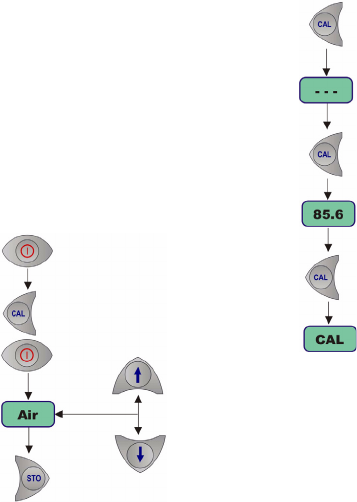
Press the CAL button.
Remember, this button may
have been locked out to prevent
an accidental reset.
A brief clearing [---] message
appears. Press CAL again
within a 3 second period. The
percentage of the measured
current to the ideal one is
displayed.
When the reading is stable, press CAL again.
If the new calibration current is within 25% to
175% of the ideal current, the instrument displays
CAL and returns to the measurement mode.
Calibration is now complete, the sensor is
calibrated, and you can proceed with your
measurements.
If the new calibration current is not within this
range, the instrument displays Err and returns to
measurement mode. The system will not
calibrate, and it is likely that a sensor service will
be required.
Calibration


