


For technical questions, please call 1-800-444-3353.SKU 38123 Page 13
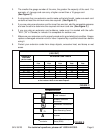
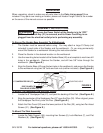
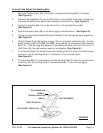
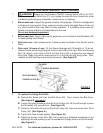
To Install And Adjust The Sanding Belt:
1. Move the Tension Lever (66) to the right to release the Sanding Belt (10) tension.
(See Figure K.)
2. Place the Sanding Belt (10) over the Drive Drum (13) and Idler Drum (65), making sure
the inside direction arrow points down towards the Drive Drum. (See Figure K.)
3. Center the Sanding Belt (10) on the Drive Drum (13) and Idler Drum (65).
(See Figure K.)
4. Slide the Tension Lever (66) to the left to tighten the belt tension. (See Figure K.)
5. Tighten the Hex Socket Screw (56) when the Bed (4) is in the desired working position.
(See Figure K.)
6. Plug the Power Cord (38) into the nearest 120 volt, grounded, electrical outlet. Turn the
power Locking Switch (22) ON, then OFF, while viewing the movement of the Sanding
Belt (10). If the Sanding Belt appears to be sliding off either the Drum Drive (13) or
Idler Drive (65), the belt tracking needs to be adjusted. (See Figure K.)
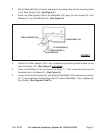
7. If the Sanding Belt (10) moved
toward
the Sanding Pad (27) when the machine was
turned on, turn the tracking Knob (1)
clockwise
1/4 turn and test again.
(See Figure K.)
8. If the Sanding Belt (10) moved away from the Sanding Pad (27) when the machine was
turned on, turn the tracking Knob (1) counterclockwise 1/4 turn and test again.
(See Figure K.)
FIGURE K
KNOB (1)
IDLER DRUM (65)
TENSION LEVER (66)
BED (4)
DRIVE DRUM (13)
HEX SOCKET SCREW (56)
BELT MOVEMENT