


For technical questions, please call 1-800-444-3353.SKU 38123 Page 17
INSPECTION, MAINTENANCE, AND CLEANING
1. WARNING! Always turn the Sander’s ON/OFF Locking Switch (22) to its “OFF”
position, remove the Switch Key (21), and unplug the machine from its electrical outlet
and before performing any inspection, maintenance, or cleaning.
2. Before each use: Inspect the general condition of the Sander. Check for misalignment
or binding of moving parts, loose, cracked or broken parts, damaged Power Cord, and
any other condition that may affect its safe operation. If a problem occurs with the
Sander, have the problem corrected before further use.
Do not use damaged equipment.
3. Before each use: Apply a light coat of paste wax (not included) to the Worktable (35)
to make feeding stock easier.
4. After each use: Use compressed air to blow out dust and debris from Sander and its
Motor.
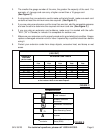
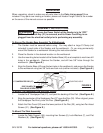
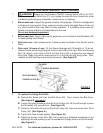
5. After each 10 hours of use: Oil the Sleeve Bearings with 30 weight oil. To do so,
release the belt tension by sliding the Tension Lever (66) to the right. Move the Sanding
Belt (10) slightly to the right or left of the Idler Drum (65) to expose the oval-shaped
oiling hole. Apply only two or three drops of oil in the left and right oiling holes. Then,
readjust the belt tracking as previously discussed. (See Figure P.)
OIL HERE
TENSION LEVER (66)
IDLER DRUM (65)
SLEEVE BEARINGS
FIGURE P
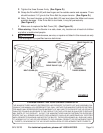
6. To replace the timing Drive Belt:
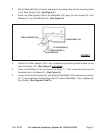
A. Remove the Screw (44) from the Belt Cover (52). Then, remove the Belt Cover.
(See Figure Q, next page.)
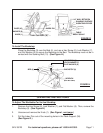
B. Loosen the three Screws to allow the Drive Pulleys (46, 49) to shift enough to place
the Drive Belt (43) around them. (See Figure Q.)
C. Place the Drive Belt (43) around the Drive Pulley (46), then around the other Drive
Pulley (49). (See Figure Q.)
D. Tighten the three Screws slightly. (See Figure Q.)
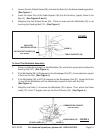
E. Adjust the tension of the Drive Belt (43) by placing a Standard screwdriver in the
adjusting hole and pushing up on the screwdriver to apply tension to the Drive Belt.
(See Figure Q.)