


Page 5 SKU # 41831
UNPACKING
1. Remove protective crating and materials carefully. In the event of damage in transit, contact
Harbor Freight Tools. Be sure you have all small parts accounted for before discarding packing
materials.
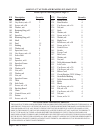
2. Check to be sure all parts are present. In addition to the planer, you should receive the accessories
noted on page 2. You should also receive a crank handle, 2 carrying handles, and 2 table extensions,
with their related hardware. If the 4 base brackets are not installed, they should be included, together
with attaching hardware.
INSTALLATION
1. It is important that the machine be located on a solid, level platform. Find a location
that has easy access to 110-120 Volt electrical service. Make sure this machine is
located in a well lighted and well ventilated area. The floor should be resistant to
vibration. There must be adequate room to insert and remove workpieces through
the planer.
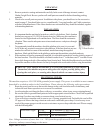
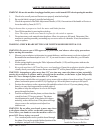
2. To permanently install the machine, check the platform to be sure it is even and
level. Make any required corrections to the platform. If the base brackets are not
attached to each lower corner of the machine, attach them using the supplied
hardware. Mark and drill holes in the platform, and mount the machine using bolts and nuts.
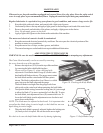
2. If the machine will not be permanently installed, it is advisable to attach it to wooden skids by means of
the base brackets. The skids should be solid hard wood at least 1” in thickness and 2” in width. Route
these skids along each side of the machine from front to back. Each skid should extend several inches
beyond the machine to allow them to be firmly clamped to the work surface before using the machine.
WARNING: Never operate this machine if it is not firmly attached to a work surface.
Unattached, the machine may move along the work surface possibly falling over,
ejecting the work piece, or creating other hazards which can cause serious injury.
ELECTRICAL POWER
This machine requires a 110-120V 60Hz grounded power supply. This power is available in most common
household or workshop outlets in the United States. Please observe the following safety precautions.
1. Route the power cord in a way that avoids damage to the cord from other tools or machinery, and
isolates the cord from exposure to wet or corrosive conditions.
2. Avoid routing the cord along the floor, walkways, or corridors, where it may cause a tripping hazard.
3. Be sure the outlet is grounded and protected with an appropriate circuit breaker. Check with a qualified
electrician if you have any doubts or concerns about your electrical service.
4. If you will use an extension cord, be sure to use a 3-prong, grounded cord. Preferably the cord will be
UL approved. Know that long extension cords cause a noticable power drop. It is necessary to use
cords of the proper gauge to avoid excessive resistance or power drop within the cord. Please comply
with the following table.
Extension Length: 0-50ft. Use minimum 12 AWG cord
50-100ft. Use minimum 10AWG cord
over 100 ft. Not Recommended
Note: Voltage variations of more than + or - 10% from the specification will result in noticable reduction
of service, and may cause damage to the motor.
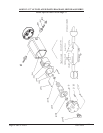
Fig 1. Base Bracket