


ADJUSTING THE CUTTING KNIVES
WARNING: Be sure the machine is turned OFF and UNPLUGGED before attempting any adjustments.
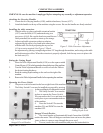
The Cutter Head assembly can be accessed by removing
the cover from the top of the machine.
1. Remove the top cover (#326) from the top of the machine
by removing the bolts which hold it in place.
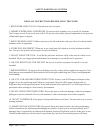
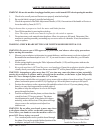
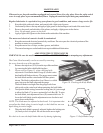
2. Please refer to Figure 11. when checking knife
adjustment. Position the knife Gauge (E) on the cutter
head and knife blade as shown. The gauge must contact
the knife blade and the cutter head at all three points
shown. The blade is adjusted too low if there is a visible
space between the blade edge and the gauge.
The knife blade is too high when the gauge rocks from
side to side on the cutter head when contacting the knife blade.
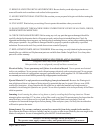
3. To adjust the blade setting, loosen the locking nuts (A) just enough
to allow the blade (C) to move against the Lock Bar (B). To raise
the knife blade, turn adjustment screw (D) counterclockwise. To
lower the knife blade, turn the adjustment screw clockwise and
press down on the blade.
NOTE: The blade must be adjusted at both ends. It is important that
you adjust the blade along its entire length, so the blade has an even
depth along its entire length.
4. When the knife blade is properly adjusted, tighten the locking nuts
(A) firmly to lock it in place. Be sure these nuts are on tight.
Re-check to be sure the knife blade did not slip during tightening.
Page 9 SKU # 41831
MAINTENANCE
When not in use, keep the machine unplugged and covered. Store it in a dry place. Store the safety switch
cover in a safe place to prevent unauthorized use. Unplug the machine before doing any maintenance.
Regular lubrication is required to keep your planer in good condition, and assure a long service life.
1. Keep the table guide rods clean, and coated with a light coat of grease.
2. Occasionally remove the top and apply a light grease to the bearings at each end of the cutter head.
3. Remove the panels on both sides of the planer, and apply a light grease to the chains.
Note: Do not apply grease to the belts.
4. Apply a light coat of grease to the chain on the underside of the machine.
The motor and electrical controls should be maintained.
1. Keep the motor and electrical controls dry and clean. Do not expose the electrical portions of the
machine to water or wet conditions.
2. Keep the motor free of chips, sawdust, grease, and debris.
3. The motor bearings are sealed and do not require additional lubrication.
Figure 11. Knife Blade Gauge
Figure 10. Checking the Knife Blade