


Page 14SKU 42654
For technical questions, please call 1-800-444-3353.
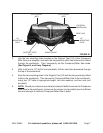
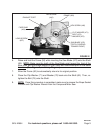
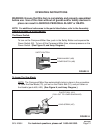
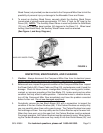
To Adjust The Angle Of The Cut:
1. Caution: Prior to adjusting the angle of the cut, make sure the Compound Miter
Saw is disconnected from its electrical power source.
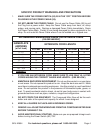
2. NOTE: The angle of cut may be adjusted up to 90 degrees to the left or right.
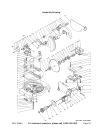
(See Figure B, and Assy. Diagram.)
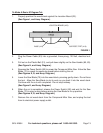
3. Lift the Handle (parts #80, #83) up and allow it to lock in place.
(See Assy. Diagram.)
4. Loosen the two Clip Screws (25), and turn the Base (12) right or left to the de-
sired angle indicated on the Angle Scale.
(See Figures B, I, and Assy. Diagram.)
5. Retighten the two Clip Screws (25) to lock the desired angle of cut in place. (See
Figure B, and Assy. Diagram.)
6. Properly position the wood stock against the Location Board (23).
(See Figure I, and Assy. Diagram.)
7. Follow Steps #1 through #7 in the previous section to complete the procedure.
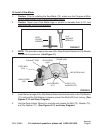
To Adjust The Bevel Angle:
1. Caution: Prior to adjusting the bevel angle, make sure the Compound Miter Saw
is disconnected from its electrical power source.
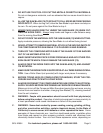
2. NOTE: The Saw Blade (70) can be angled up to 45 degrees to the left by adjust-
ing the Long Screw (37) located at the back of the Compound Miter Saw. (See
Figures D, E, F, H, and Assy. Diagram.)
3. Loosen the Long Screw (37), and rotate the Saw Blade (70) to the desired bevel
angle. Then, retighten the Long Screw.
(See Figures D, E, F, H, and Assy. Diagram.)
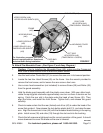
To Attach An Auxiliary Wood Fence:
Caution: When performing multiple or repetitive cutoff operations that result in small
cutoff pieces (1” or less), the Saw Blade (70) may catch the cutoff pieces and proj-
ect them away from the Compound Miter Saw or into the Moveable Cover (43) and
Frame (50). This can result in personal injury or damage to the tool. An Auxiliary
1.