


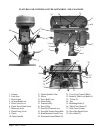

Preparing for Milling
1. Loosen the Chuck Travel Limit Screw (#6).
2. Install the cutting bit needed to perform the intended milling operation.
3. Using the Chuck Feed Lever (#5), adjust the bit to approximately the correct height. Tighten the Chuck
Fixing Lever (#8).
4. Set the final vertical adjustment using your milling jig or fixture (not included) or the included 70
O
precision vise.
5. Set the horizontal adjustment using the Horizontal (#20) or Cross Feed Control Wheels (#21).
6. Depending on whether the cut will be made in the X-axis (left or right) or the Y-axis (front to back) one
dimension of the table can be locked into place using one of the two pairs of Butterfly Lock Bolts (#22)
located under the Table on the right side or above the Cross Feed Control Wheel.
Moving the Table
1. The table can be moved horizontally and front to back by using the Control Wheels.
2. If the table is to be moved in one direction only, it can be prevented from moving in the other by
tightening the butterfly bolts under the right side or front of the table. The table can also be locked in
both directions, for example when drilling.
3. The table travel from left to right can also be limited by adjusting the position of the Table Stops (#26).
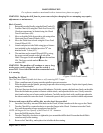
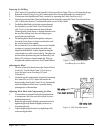
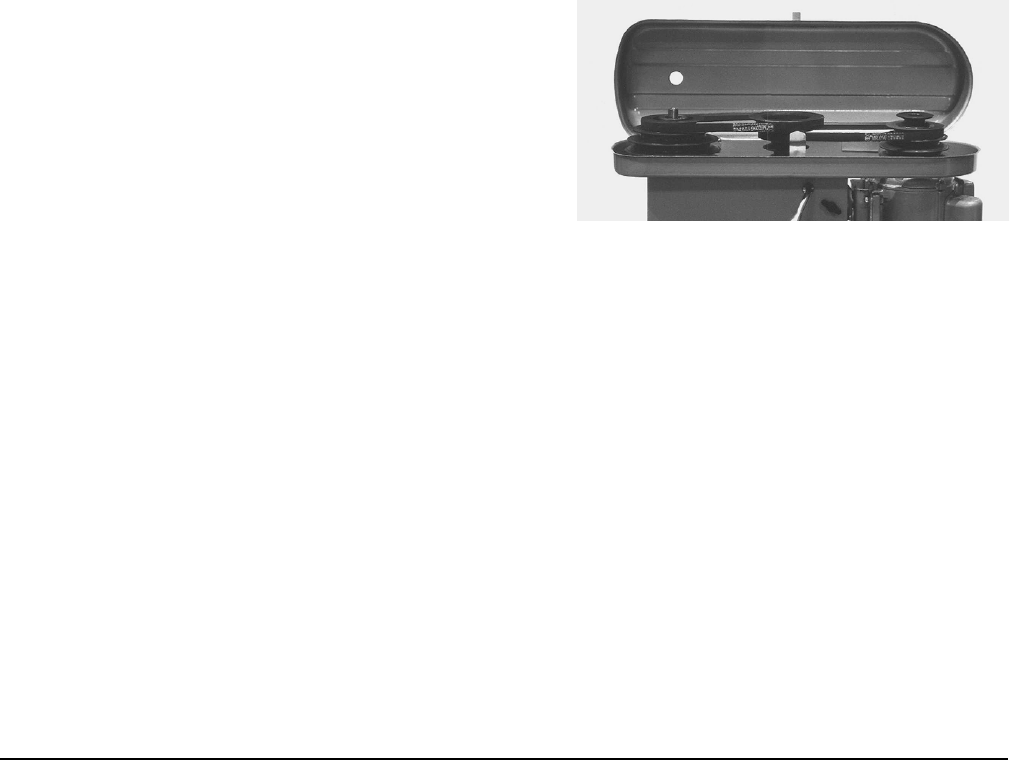
Changing Machine Speed
1. Turn the power off and unplug the power cord.
2. To select the proper speed, loosen the Drive Bolt
Tension Fixing Bolt (#18), then loosen the Drive Belt
Tension Lever (#17).
3. Open the Drive Belt Cover (#13).
4. Following the speed chart which is mounted on the
front of the head, position the two drive belts on the
pulleys to achieve the desired speed.
5. Tension the belts by moving the Drive Belt Tension
Lever (#17). Secure the belt tension by tightening
the Fixing Bolt (#18).
TROUBLE SHOOTING
WARNING! Never perform trouble shooting or maintenance unless the tool is turned OFF
and unplugged from its power supply.
The motor overheats, or there is insufficient power.
1. The machine is overloaded. Reduce the feed rate, and/or increase the spindle speed.
2. The voltage supply is too low. If you have an unreliable power supply, check with a qualified electrician
to repair it.
3. The motor carbon brushes may be worn or cracked. Check them and replace if needed.
4. There may be a poor electrical connection. Have a qualified electrician check the wiring and power
supply.
5. The motor may be burned out. After a long period of heavy use, the motor may burn out. If so, replace
the motor.
6. The drill bit or cutting blade may be worn. Sharpen or replace the bits as needed.
Page 10 SKU # 42976
Figure 5. Machine Speed Drive Belt Settings.