Page 17SKU 45861 For technical questions, please call 1-800-444-3353.
Softer metals require higher cutting 2.
speeds. Consult a machining manual
to determine the rotation speed that
must be set to cut the metal.
The tumbler gear lever must be in the 3.
neutral position so that the leadscrew
does not rotate.
Clamp the half nut on the leadscrew 4.
to keep the saddle from being forced
back from the workpiece during cut-
ting.
To center the workpiece; close the 5.
chuck until the jaws touch its surface,
twist the workpiece to seat it; then
tighten the jaws. Tighten the jaws
from all three chuck key positions to
ensure even gripping by the jaws.
Clamp the cutting tool in the tool post 6.
and turn the toolpost so that the tip
of the cutting tool will meet the end of
the workpiece at a slight angle. The
tip of the cutting tool must be at the
centerline of the lathe, or the work will
be marred.
Clamp the toolpost in place and 7.
advance the carriage until the tool is
even with, but not touching the end of
the workpiece.
Set the lathe to its lowest speed and 8.
turn it on. Make sure the leadscrew
is not turning.
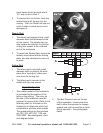
Turn the lathe off and press the 9.
Halfnut lever down to engage it with
the leadscrew. Locking the half-nut
to the leadscrew will prevent the
carriage from moving back away
from the workpiece during the facing
operation.
Use the compound crank to advance 10.
the tool until it touches the end of the
workpiece. Use the cross feed crank
to back off the tool until it is beyond
the diameter of the workpiece.
Turn the lathe on and adjust the 11.
speed to low RPM.
Use the cross feed crank to slowly 12.
move the tool towards the workpiece.
When the tool touches the workpiece 13.
it should start to remove metal from
the end. Continue advancing the tool
until it reaches the center of the work-
piece, then crank the tool back until it
is past the end of the workpiece.
Continue slowly moving the tool clos-14.
er to the workpiece until the desired
facing is achieved.
After the facing operation is complet-15.
ed the sides of the workpiece should
be led to eliminate the sharp edge.
Drilling
Face the workpiece as described 1.
above to ensure a clean surface for
drilling.
Note: Drill chucks, center drills and drills
are not included with this Lathe.
Attach a drill chuck and secure a cen-2.
ter drill into it.
Use the center drill that is about the 3.
same size as the hole you intend to
drill to bore a starter hole. Drilling a
starter hole will prevent the drill from
wandering off-center.
Allow the center drill to cool before 4.
removing it from the drill chuck and
inserting the drill.
Use the drill to bore a hole two full 5.
diameters of the drill at a time. After


