


SKU 46225 For technical questions, please call 1-800-444-3353. Page 5
Extension Cords
Your tool has a three-prong plug, therefore you must use a three-prong extension
cord. Only use rounded jacket extension cords listed by the UL. Improper use of
extension cords may cause inefficient operation of your tool which can result in
overheating. Be sure your extension cord is rated to allow sufficient current flow to
the Motor. If you are using the tool outdoors, use an extension cord rated for out-
door use (signified by “WA” on the jacket).
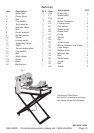
Unpacking
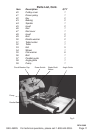
When unpacking, check to make all parts listed on Pages 10-11 are included. If any
parts are missing or broken, please call Harbor Freight Tools at the number on the
cover of this manual.
Note: Table Stand SKU #46310 is specifically designed for use with this 10” Tile
Saw and is not included. Stand is available for purchase from Harbor Freight Tools.
See Fig. 1 on Page 9 for a view of the Table Saw and Stand assembly.
If the Stand is not to be used with the Tile Saw, the Saw must be securely mounted
onto a flat, level surface capable of supporting the weight of the Tile Saw in addition
to the weight of all work pieces.
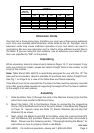
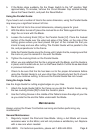
RECOMMENDED MINIMUM WIRE GAUGE FOR EXTENSION CORDS
*
(120 VOLT)
NAMEPLATE
AMPERES
(
At Full Load
)
EXTENSION CORD LENGTH
25
Feet
50
Feet
75
Feet
100
Feet
150
Feet
0 – 2.0 18 18 18 18 16
2.1 – 3.4 18 18 18 16 14
3.5 – 5.0 18 18 16 14 12
5.1 – 7.0 18 16 14 12 12
7.1 – 12.0 18 14 12 10 -
12.1 – 16.0 14 12 10 - -
16.1 – 20.0 12 10 - - -
* Based on limiting the line voltage drop
to five volts at 150% of the rated amperes.
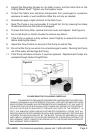
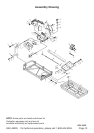
Assembly
1. Slide the Water Tank [1] through the slots in the Machine Frame [6] so that the
entire Tank rests inside the Machine Frame.
2. Mount the Motor [19] to the Machine Frame by connecting the Supporting
Frame [12] to the Machine Frame at the point shown in the Assembly Diagram
on Page 12. Secure using two Bolts [7], Elastic Washers [8] and Big Flat
Washers [9] as shown.
3. Next, attach the Blade Guard [20] to the Motor using the Locking Knob [23]
and Flat Washer [24] provided. Please note: this product does not include a
Blade. Please see the following section, “Changing/Installing the Blade,” for
instructions on how to properly install a new Blade.
REV 08/04