


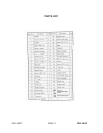
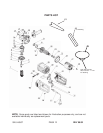

SKU 46507 PAGE 9
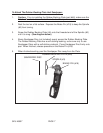
1. Caution: Check to make sure the Switch (part #33) is in its “OFF” position before
plugging the Power Cord (part #36) into a 110-120 Volt, grounded,
electrical power outlet. (See Figures B, C, and Assy. Diagram.)
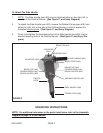
2. Make sure to use
both hands to
firmly
grip the Polisher/Sander by its Side
Handle (part #20) and Back Handle (part #39). (See Figures B, C, and Assy.
Diagram.)
3. To turn on the Polisher/Sander, squeeze the Switch (part #33). To turn off the
Polisher/Sander, release pressure on the Switch. NOTE: For automatic, continu-
ous running, squeeze the Switch while, at the same time, depressing the Switch
Lock. This locks the Switch in its “ON” position. To turn off the Polisher/Sander,
squeeze and quickly release pressure on the Switch. This unlocks the Switch,
and allows the Polisher/Sander to automatically turn off. (See Figures B, C, and
Assy. Diagram.)
4. Allow the Polisher/Sander to spin up to full speed before pressing it onto the
workpiece. (See Figures B, C, and Assy. Diagram.)
5.
NOTE: The Polisher/Sander can be operated at different speeds (from 1,000
RPM to up to 3,000 RPM), depending on the material of the workpiece. To
change speeds,
make sure the Polisher/Sander is off.
Then, select the desired
speed, using the Variable Switch (part #31). (See Figures B, C, and Assy.
Diagram.)
6. Do not force the Polisher/Sander onto the workpiece. Apply moderate pressure,
allowing the Polisher/Sander to do the work without being forced. (See Figures
B, C, and Assy. Diagram.)
7. Move the Polisher/Sander along the workpiece in small, circular, patterns. (See
Figures B, C, and Assy. Diagram.)
8. When finished, turn off the Polisher/Sander and allow the Polishing Disc or the
Rubber Backing Plate to spin down and stop on their own. Do not press against
the disc to stop them. (See Figures B, C, and Assy. Diagram.)
INSPECTION, MAINTENANCE, AND CLEANING
1.
Caution:
Always disconnect the Polisher/Sander from its electrical power supply
source before performing any inspection, maintenance, or cleaning.
2. Before each use, inspect the general condition of the Polisher/Sander. Inspect
switch, power plug and cord assembly, and extension cord (if used) for damage.
Check for loose screws, misalignment, binding of moving parts, broken, cracked,
or improper mounting of the Polishing Disc or the Rubber Backing Plate, broken