


Sku 46766 For technical questions, please call 1-800-444-3353. Page 4
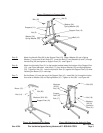
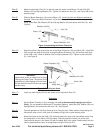
Step 3) With the assistance of another person, attach the Support Post (10) to the Base (4). Insert
both Bolts (9) down through the bottom bracket of the Support Post (10). Slide on Washers
(32), and slide on Spring Washers (33). Tighten Nuts (18) - see Figure 2.
Step 4) Attach both of the Supports (11) to the Base (4), one at each end. For each Support, insert a
Bolt (12) through the hole in the bottom of the Support (11), and through the Base (4). Slide
on Washers (34), Spring Washers (35) and tighten on Nut (2) - see Figure 3 on following
page. Line up the holes at the top of the Support (11) with the second hole down on the
Support Post (10). Attach Supports (11) to the Support Post with Bolt (12). Slide on Washer
(34) and Spring Washer (35). Tighten on Nut (2).
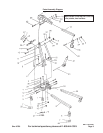
Line up the holes in each Small Caster (1) with the holes on the Base (4). One Small Caster
(1) is to be attached to each side of the Base (4). For each Small Caster (1), slide four (4)
Bolts (27) up through a Spring Washer (7), and through Washer (6) and into Base (4).
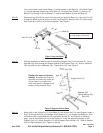
Step 2) Slide each Leg (8 & 25) into each of the two slots on top of the Base (4). Insert two Pins (3)
through the Base (4) at the junction of each Leg (8 and 25). Attach a Hitch Pin (24) through
each of the four (4) Pins (3) to secure together - see Figure 1.
Base (4)
Pin (3)
Leg (8)
Leg (25)
Hitch Pin (24)
Make certain to set up the Crane
on a flat, stable, level surface.
Figure 1-Leg into Base
(4)
(27)
Washers (32)
Spring Washer (33)
Nuts (18)
Grip (36)
Support Post (10)
Figure 2-Support Post to Base
Caution: Be aware of dynamic
loading! A sudden start or jerk of
the chain and hook may create for
a brief instant, an excess load,
which may result in damage to the
product and/or personal injury.
REV 11/02; 05/05