


Warning: The warnings, cautions, and instructions discussed in this instruction manual cannot
cover all possible conditions and situations that may occur. It must be understood by
the operator that common sense and caution are factors which cannot be built into
this product, but must be supplied by the operator.
Assembly
Your Quick Action 8-Position Workbench will require complete assembly prior to use. It is important
that you read the entire manual to become familiar with the product BEFORE use. Before
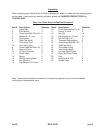
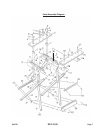
assembling the Workbench be sure that you have all parts described in the Parts List and Assemby
Diagram located on the last pages of this manual.
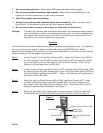
Step 1) Locate the two (2) Left Leg Stand Frames (#26). Attach Tool Holder (front) (#24) to
the Left Leg Stand Frames (#26) by inserting a Hex Bolt (#29) through each corner
of the Tool Holder (front) and through the Left Leg Stand Frame(s). Slide on Flat
Washer (#19) and fasten Hex Nut M6 (#18).
Step 2) Locate the two (2) Right Leg Stand Frames (#27) and attach Tool Holder (back) (#25)
by inserting a Hex Bolt (#29) through each corner of the Tool Holder (back) (#25) and
through the Right Leg Stand Frame (#27). Slide on Flat Washers (#19) and fasten in
place with Hex Nut M6 (#18).
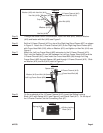
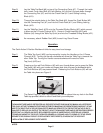
Step 3) Attach the Left Leg Stand Frames (#26) to Right Leg Stand Frames (#27). Insert
Hex Bolt (#20) through Right Leg Stand Frames (#27) and slide on Spacer (#17)
then slide on Left Leg Stand Frame and Washer (#19). Secure with Hex Nut (#18).
Repeat for second side of Workbench-see Figure 1.
Step 4) Attach the Grip (#28) to the lowest hole in the top extension of the Left Leg Stand
Frames (#26) with Hex Bolt (#29) Washer (#19) and Hex Nut (#18)-see Figure 2.
#47078 Page 3
8. Use eye and ear protection. Always wear ANSI approved impact safety goggles.
9. Do not exceed products maximum load capacity. Make certain that the Workbench can
support all tools and accessories, as well as any workpiece.
10. Avoid Sharp edges when assembling.
11. Always check hardware and assembled parts after assembling. Place in an area that is
flat and level. All connections should be tight and hardware tightened.
12. Do not allow children to play on, stand upon or climb upon the Workbench.
Figure 1
Right Leg Stand Frame (#27)
Spacer (#17)
Hex Bolt (#20)
Left Leg Stand Frame
(#26)
Washer (#19)
Hex Nut (#18)