


Page 9SKU 47404 For technical questions, please call 1-800-444-3353.
OPERATING INSTRUCTIONS
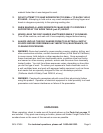
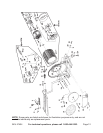
NOTE: For additional references to the parts listed below, refer to the Assembly
Diagram on page 12.
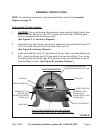
1. CAUTION: Prior to beginning to use, make sure the Safety Switch (part #32) is
in its “OFF” position and the Power Cord/Plug (part #34) is unplugged from its
electrical outlet. (See Figures C, D, and Assy. Diagram.)
2. Make all necessary adjustments to the Disc Sander as previously discussed.
Make sure the distance between the Work Table (part #7) and Sanding Disc and
Sanding Disc (part #14) does not exceed 1/16”.
3. Plug the Power Cord/Plug (part #34) into the nearest 120 volt, grounded, 3-
prong, electrical outlet. (See Figure B, and Assy. Diagram.)
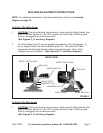
4. Turn the Safety Switch (part #32) to its “ON” position, and allow sufcient time
for the Sanding Disc (part #14) to spin at full speed for 2 to 3 minutes. Check for
proper sanding disc alignment. (See Figure B, and Assy. Diagram.)
5. With both hands, slowly and carefully place the workpiece on the Work Table
(part #7) and against the at edge of the Miter Gauge (part #3), taking care not to
allow the workpiece to immediately touch the spinning Sanding Disc (part #14).
(See Figure B, and Assy. Diagram.)
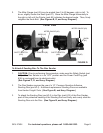
6. With both hands, rmly hold the workpiece down on the Work Table (part #7) and
against the Miter Gauge (part #3). While holding the workpiece with one hand,
use the other hand to grasp the Miter Gauge and slowly push the workpiece into
the spinning Sanding Disc. CAUTION: ALWAYS KEEP HANDS AND FINGERS
AWAY FROM THE SANDING DISC. (See Figures B, D, and Assy. Diagram.)
7. NOTE: Make sure to feed the workpiece gradually into the spinning Sanding
Disc. Do not force the machine to remove material faster than it was designed
to sand. If necessary, use the Miter Gauge (part #3) to back the workpiece away
from the spinning Sanding Disc (part #14) and repeat Step #6 until the desired
amount of material has been sanded off the workpiece.
(See Figures B, D, and Assy. Diagram.)
8. Once the sanding job is completed, back the workpiece slightly away from the
spinning Sanding Disc (part #14). Keep a rm grip on the workpiece with one
hand, and with the other hand turn the Safety Switch (part #32) to its “OFF”
position. Wait until the Sanding Disc has completely stopped spinning. Then,
remove the workpiece from the machine and unplug the Power Cord/Plug (part
#34) from its electrical outlet. (See Figures B, C, D, and Assy. Diagram.)