Page 10SKU 47612 For technical questions, please call 1-800-444-3353.
Inspection, Maintenance, and Cleaning
1. Inspect the Nailer frequently and lubricate periodically with Pneumatic tool oil,
then wipe dry. Do not use detergent oil or additives as these lubricants will cause
accelerated wear to the internal seals.
2. Inspect the air supply lter, if present, before each use and clean or replace as
necessary. Dirt and water in the air supply lter are major causes of pneumatic
tool wear. Use a lter/oiler for better performance and longer tool life. The lter
must have adequate ow capacity for the specic application.
3. Clean the external parts of the Nailer with a clean cloth and mild detergent or
nonammable solvent. Then, dry.
4. Store the unit in a safe, clean, dry location out of reach of children and other un-
authorized people.
5. All maintenance, service, or repairs not listed in this manual are only to be
attempted by a qualied technician.
Please Read the Following Carefully
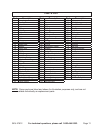
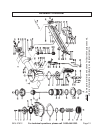
THE MANUFACTURER AND/OR DISTRIBUTOR HAS PROVIDED THE PARTS LIST AND ASSEMBLY DIAGRAM IN
THIS MANUAL AS A REFERENCE TOOL ONLY. NEITHER THE MANUFACTURER OR DISTRIBUTOR MAKES ANY
REPRESENTATION OR WARRANTY OF ANY KIND TO THE BUYER THAT HE OR SHE IS QUALIFIED TO MAKE ANY
REPAIRS TO THE PRODUCT, OR THAT HE OR SHE IS QUALIFIED TO REPLACE ANY PARTS OF THE PRODUCT.
IN FACT, THE MANUFACTURER AND/OR DISTRIBUTOR EXPRESSLY STATES THAT ALL REPAIRS AND PARTS
REPLACEMENTS SHOULD BE UNDERTAKEN BY CERTIFIED AND LICENSED TECHNICIANS, AND NOT BY THE
BUYER. THE BUYER ASSUMES ALL RISK AND LIABILITY ARISING OUT OF HIS OR HER REPAIRS TO THE
ORIGINAL PRODUCT OR REPLACEMENT PARTS THERETO, OR ARISING OUT OF HIS OR HER INSTALLATION
OF REPLACEMENT PARTS THERETO.
Anytime any maintenance or repairs are done (including clearing jams), FIRST:
Disconnect the Nailer from the air hose.1.
Empty the Magazine (69) completely.2.
Attempt to re the Nailer into a piece of scrap wood to ensure that it is discon-3.
nected and is incapable of ring any nails.


