


SKU 66399 For technical questions, please call 1-800-444-3353. Page 8
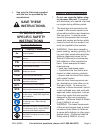
Fig. 3
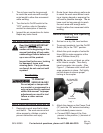
17. Allow this compressor to cool, then
wipe down and replace into the stor-
age bag supplied with this unit. (See
Fig. 3.) Note: There is also a small
storage bag for inator nozzles that is
attached to the Rubber Hose.
Store in a dry location. 18.
USER-MAINTENANCE
INSTRUCTIONS
Procedures not specically
explained in this manual
must be performed only by a
qualied technician.
TO PREVENT
SERIOUS INJURY
FROM ACCIDENTAL
OPERATION: Turn off the tool,
detach the Power supply
clamps, safely discharge any
residual air pressure in the
tool, and release the throttle
and/or turn the switch to its
off position before performing
any inspection, maintenance,
or cleaning procedures.
TO PREVENT SERIOUS
INJURY FROM TOOL
FAILURE: Do not use
damaged equipment. If
abnormal noise, vibration,
or leaking air occurs, have
the problem corrected before
further use.
Cleaning, Maintenance and
Lubrication
Note: These procedures are in addition to
the regular checks and maintenance
explained as part of the regular op-
eration of the Air Compressor.
Wipe down the compressor with a 1.
clean dry cloth.
Check the hoses to be sure there are 2.
no cracks or worn areas.
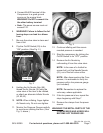
Rotate Filter counterclockwise and 3.
remove from the compressor. Gently
pry the cover from the threaded end.
Remove the lter, wash in warm wa-
ter and liquid soap (no harsh powder
soap), rinse thoroughly, and let dry
Insert back into the lter holder. Align 4.
the three indexing ribs on lter hous-
ing with the three recessed grooves
in the lter cover and push the cover,
snapping it onto the housing. Thread
the assembly back into the front cov-
er, being careful not to cross thread it.
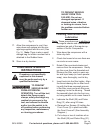
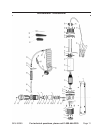
Lubricate the Shaft (30) and Piston 5.
Ring (31) after using 20 times.
Remove four Screws (4) holding the a.
Front Cover (5) in place and slide
the Front Cover off. (See Assembly
Diagram.)
Put a drop or two of machine oil on b.
the Shaft (30) and Piston Ring (31).
REV 10a