


Page 9SKU 66787 For technical questions, please call 1-800-444-3353.
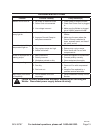
SPECIFICATIONS
Electrical
Requirements
240V~ / 60 Hz / 25A max.
Power Cord: SJT 12AWG x 3C
Power Plug: 3-Prong, 240 VAC
(Not Included)
Output
Amperage
Range
10-130 Amps
Maximum
Open Circuit
Voltage
61V
Duty Cycle
40% @ 130 Amps
60% @ 120 Amps
100% @ 80 Amps
Maximum
Welding
Capacity
1/4” - For Welding Steel Only
Electrode
Diameter
Capacity
For Use With
1/16”, 3/32” and 1/8” Diameter
Rods
Electrode
Holder Head
Ground Cable
75”
65”
Torch Cable
Length
12’ 9”
Gas Hose 8’ 6” L, 0.34” OD, .19” ID
Additional
Features
May be used for both arc and tig
welding.
Quick starting with high open
voltage.
Anti-Stick circuit works with
rutile, basic steel, stainless
steel, and cast iron electrodes.
Additional amperage during
short arc length conditions
increases electrode penetration.
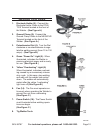
UNPACKING
When unpacking, check to make sure
that the item is intact and undamaged. If
any parts are missing or broken, please
call Harbor Freight Tools at the number
shown on the cover of this manual as soon
as possible.
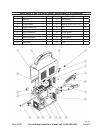
Note: For TIG Welding Torch Parts
List and Diagram, refer to page 17.
REV 09h, 09l
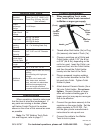
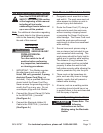
When assembling Torch, make 1.
sure Torch Cable is not connected
to Welder or argon gas supply.
Ceramic
Nozzle
(3a/3b)
Rod
Holder
(2a)
Gas Flow
Knob
Handle
(Front)
(Back)
2. Thread either Rod Holder (2a) or Plug
(6a) securely into back of Torch (1a).
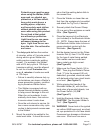
Choose a matching set of Collet and 3.
Collet Holder, either 1/16” (4a & 5a)
or 3/32” (4b & 5b), depending on the
rod to be used. Insert the Collet, nar-
rower end rst, into the Collet Holder,
and then thread the Collet Holder
loosely into the front of the Torch.
Place a prepared tungsten welding 4.
rod (the correct diameter for the Col-
let used) into Collet. Tighten Collet
Holder in place.
Attach desired Ceramic Nozzle (3a or 5.
3b) onto Collet Holder. Do not over-
tighten. Ceramic Nozzles of larger
sizes will contain shielding gas in a
larger area, but may require more gas
ow to be effective.
Connect the gas hose securely to the 6.
regulator on the argon bottle. Set the
argon regulator to 18-22 PSI. Fol-
low the gas cylinder manufacturer’s
instructions for set-up and use.
Connect the cable to the Welder. 7.
Twist to lock in place.
TORCH ASSEMBLY