


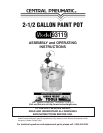

Page 6SKU 93119
For technical questions, please call 1-800-444-3353.
WARNING: Always make sure that the equipment connected to the pot
or hose outlet has a higher pressure rating than the regulated air pres-
sure in the pot.
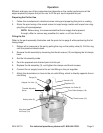
Operating the Pot
Turn ON the air supply at the recommended PSI range (30-60 PSI).
Adjust the paint pressure by turning the T-handle adjusting screw (on regulator) clockwise
to increase pressure and counterclockwise to decrease the pressure.
Adjust the atomization air for the spray by using the regulator on the pot.
Operate the spray gun according to the manufacturer’s instructions.
Clean the pot, paint hose and spray gun as soon as the job is done or is finished for the
day.
If the pot is not operating properly, refer to the Troubleshooting section on page 8.
1.
2.
3.
4.
5.
6.
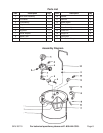
Maintenance
Maintenance of the Paint Pot consists of cleaning it thoroughly after each use by performing
the following procedures:
Turn OFF the main air supply to the pot.
Relieve all pressure from the pot by turning the regulator T-handle counterclockwise, and
then pull the ring on the safety valve until the pressure bleeds down.
Loosen the Thumb Screws and tip the lid clamps back.
Tip the pot lid to one side.
Loosen the spray gun air cap retaining ring about three turns.
Turn on the air supply.
Cup a cloth over the spray gun air cap and pull the trigger. This forces the paint back
through the hose and into the pot.
Empty and clean the pot, and clean the parts that come into contact with the paint. Use
a suitable solvent.
Pour the solvent into the pot.
Replace the lid and tighten the thumb screws and clamps.
Spray until clean solvent appears.
Repeat steps 4 through 7.
Ensure that the ports to the safety valve, gauge, and outlets are free of hardened paint
or other materials which could prevent the free movement of air.
Note: Occasionally check the gauge. The needle should return to zero
with the pressure off.
1.
2.
3.
4.
5.
6.
7.
8.
9.
10.
11.
12.
13.