


Page 8 For technical questions, please call 1-800-444-3353. SKU 94573
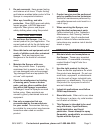
To Fill The Tank:
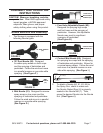
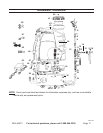
FIGURE K
TANK
CAP (41)
TANK
FILTER (42)
TANK
(64)
1. Prior to lling the Tank (64) of the
Sprayer with liquid, remove the Tank
Cap (41) and check to make sure the
Tank Filter (42) is clear of dirt and debris.
If necessary, remove the Filter and
thoroughly clean. (See Figure K.)
Next, insert the Tank Filter back into the 2.
opening of the Tank.
Fill the Tank with up to 4.8 gallons of 3.
liquid. Then, replace the Tank Cap on
the Tank.
To Operate The Sprayer:
CAUTION! Make sure other adults, children,
and animals do not have access to the
spray area(s).
NOTE: The Sprayer is heavy when
completely lled with liquid. Strap the
Sprayer on with assistance. Adjust the
Back Strap (45) as needed.
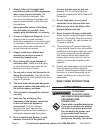
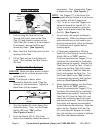
TRIGGER
(17)
HANDLE
(21)
TRIGGER
LOCK (16)
SPRAY
ROD (9)
FIGURE L
1. Grip the Handle (21) of the Spray Gun
Assembly rmly. Then, turn the Power
Switch (58) to its “ON” position.
(See Figures E and L.)
Point the Nozzle (60, 61, 62) of the 2.
Spray Gun Assembly toward the area to
be sprayed. Then, squeeze the Trigger
to begin spraying. (See Figure L.)
NOTE: The Trigger (17) of the Spray Gun
Assembly may be locked in a continuous
run position with the Trigger Lock
(16). To do so, move the Trigger Lock
backward toward the Handle (21). To
return to manual operation, move the
Trigger Lock forward toward the Spray
Rod (9). (See Figure L.)
As you spray, the system will begin to 3.
depressurize. When the distance of the
spray diminishes you will need to stop
spraying momentarily. Allow the Sprayer
to re-pressurize its system before
spraying again.
If it becomes necessary to rell the 4.
Tank (64) of the Sprayer, turn the Power
Switch (58) to its “OFF” position.
Continue squeezing the Trigger (17) on
the Spray Gun Assembly to completely
de-pressurize the system. Remove the
Tank Cap (41) from the Tank. Check to
make sure the Tank Filter (42) is clear
of dirt and debris. Rell the Tank with
liquid, and replace the Tank Cap. Turn
the Power Switch to its “ON” position
to pressurize the system, and continue
spraying. (See Figures E and K.)
When nished spraying, turn the Power 5.
Switch (58) to its “OFF” position.
Continue squeezing the Trigger (17) on
the Spray Gun Assembly to completely
depressurize the system. Remove the
Tank Cap (41) from the Tank (64), and
empty any remaining liquid into a safe
and secure container. Clean the Sprayer
thoroughly with agents recommended
by the chemical manufacturer. Allow the
unit to air-dry. Replace the Tank Cap
(41), and store the Sprayer in a clean,
dry, safe location out of reach of children
and other unauthorized people.