


Page 4SKU 96300
For technical questions, please call 1-800-444-3353.
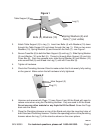
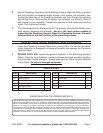
Leg (1)
Table Support (2)
Bolts (4), Washers (10)
Spring Washers (9) and
Nuts (7) (not visible)
Figure 1
Attach Table Support (2) to Leg (1). Insert two Bolts (4) with Washers (10) down
through the Table Support (2) and down through the Leg (1). Slide on two more
Washers (10), Spring Washers (9) and thread on the Nuts (7) - see Figure 1.
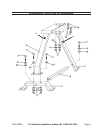
Secure Cross Bar (8) to both the Main Support (3) and Leg (1). Slide Spring Washer
(9) and Washer (10) onto Bolt (5). Thread in through Main Support (3) and into
Cross Bar (8). From the opposite side, slide Spring Washer (9) and Washer (10)
onto second Bolt (5) and thread into Leg (1) and into Cross Bar (8).
Tighten all hardware.
Check the Planishing Hammer Stand to make certain that it sits evenly, fully resting
on the ground. Make certain that all hardware is fully tightened.
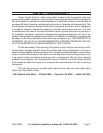
Plug (11)
Main Support (3)
Figure 2
Unscrew and remove both Plugs (11)-see Figure 2-and fill the Stand with sand to
reduce noise when using the Planishing Hammer. Only use sand to fill the Stand.
Do not use any other material or any liquid to fill the Stand. Screw the Plugs
back onto the Stand.
Place the Planishing Hammer on top of the Stand and align the mounting holes of
both Stand and Planishing Hammer. Position the operating portion of the planishing
hammer above the Leg (1) of the stand as shown on the cover picture.
2.
3.
4.
5.
6.
7.
REV 07f