


Page 12- SKU: 98870
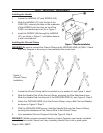
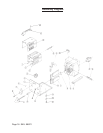
CONTROLS
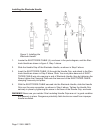
POWER SWITCH (1). Use this selec-
tor to turn the welder Off, or On to
the correct Voltage. WARNING: It is
imperative that you select ONLY the
Voltage setting for which you have
wired the Power Cable.
POWER CABLE (2). You will have
wired this for either 115 or 230 Volts.
AMPERAGE CONTROL KNOB (3).
Use this control to regulate the Am-
perage. Turn in the direction indicated
by the arrow to increase or decrease
Amperage.
GROUND CABLE (4). Use the clamp
on this cable to ground your work-
piece.
ELECTRODE CABLE (5). Use the Electrode on this cable to hold the welding rod,
and to weld.
GREEN PILOT LAMP (6). This lamp indicates that the Welder is turned On.
YELLOW LAMP (7). This lamp lights when the Welder has overheated, and the
thermostat has tripped. Notice: If the Yellow Warning Light goes on. Stop welding,
turn off and unplug the welder, and wait at least 15 minutes for the unit to cool down.
Recheck your electrode selection and Amperage setting to determine if they are cor-
rect for the welds being made. When restarting, either use a lower Amperage set-
ting, or allow more time between welds to avoid overheating the Welder. Continued
overheating can cause damage.
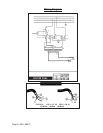
SETTING THE CORRECT AMPERAGE
Control the Amperage of your Arc Welder by turning the AMPERAGE CONTROL
KNOB (3) on the front of the welder, and reading the setting through the CLEAR COVER
(23) on top of the welder, and comparing the position of the INDICATOR (24) with the infor-
mation on the label.
WARNING! If welding at 115 Volts, do not exceed 70 A, or the 30 A breaker switch in your
power source will trip.
WARNING! Never use an extension cord for this unit that is not UL rated for the Voltage
and Amperage that the welder requires.
ARC WELDING BASICS
In Arc Welding, the electrical arc struck between the electrode and the welding joint
generates such a high temperature that it melts both the electrode and the base
metal. As this molten metal pool cools, it welds the joint.
To consistently achieve good weld joints, it is important to have the right equipment,
use the proper electrodes, prepare the workpiece properly, and utilize skill which can
only be gained through training and practice. While this booklet provides useful and
1.
2.
3.
4.
5.
6.
7.
1.
2.