


H.E.R.O. INDUSTRIES Model 3000 Owner’s Manual
23
REPLACEMENT OF INTAKE SEAT
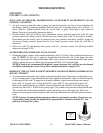
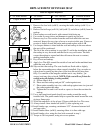
1. Remove the four bolts (ref# 9), securing the intake endcap (ref# 11) to
the pump.
2. Remove the ball cage (ref# 14), ball (ref# 13) and elbow (ref# 8) from the
endcap.
3. Place endcap on work bench, with external side facing up.
4. Use socket or screw driver and hammer to gently tap out seat.
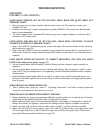
5. Remove any Loc-Tite residue from the area from which the seat was
removed. Inspect for any signs of wear or erosion in this area. If wear or
erosion is found, discard the entire endcap and replace with 4-4B.
6. Use lacquer thinner to clean both the seat and endcap in the area where
the seat will be positioned.
7. The fit of the seat to endcap is very tight. To aid in the installation, place
the endcap in very hot water and the seat in very cold water. The heat
causes the endcap to expand and the cold causes the seat to contract,
making installation easier.
8. Dry off seat and endcap.
9. Apply Loc-Tite 609, around the outside of seat and in the machined area
where the seat will rest.
10. Slip seat into the endcap. The seat should rest flush with or slightly
below the surrounding area, when correctly installed. Use a wooden or
nylon dowel to gently tap into place if the seat did not fall into place
fully. Use caution as the tungsten carbide seat is very brittle, ( yet
strong ) and may chip or break. NOTE: If the seat will not fit into the
endcap using the heating /cooling method;
A. Follow steps 6 & 8.
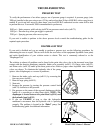
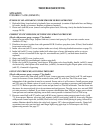
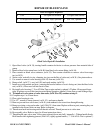
B. Place seat into endcap and put 5/8” socket against seat.
C. Place entire assembly into vise, with endcap against one vise jaw and
the socket against the other.
D. Tighten the vise and it will work as a press to force the seat into the
endcap.
11. Use a steel punch and punch four(4) new marks around the newly
installed seat. The punch marks help to expand the metal around the seat,
giving a firmer grip.
12. Allow the endcap to sit for at least 12 hours while the Loc-Tite cures.
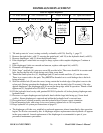
13. Always install a new intake ball (ref# 13) after replacing seat.
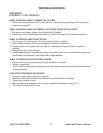
14. Install intake cage, ensuring a minimum 1/32” clearance between ball
and cage sides.
15. Install intake elbow (ref# 8), ensuring elbow is in line with cage.
16. Install intake valve, using the four bolts removed in step 1.
17. Torque to 30 foot pounds, using criss-cross pattern.
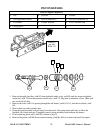
9
8
11
Socket
Seat ( ref# 12 )
Clean, free
of defects
Cross Section View
Clearance
♦ 1/4 Allan wrench ♦ 5/8 Socket ♦ Loc-Tite 609
♦ Torque Wrench ♦ Hammer ♦ Lacquer Thinner
Tools or Supplies Required
♦ Crescent Wrench
♦ Vise – Optional