H.E.R.O. INDUSTRIES Model 3000 Owner’s Manual
25
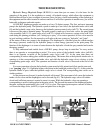
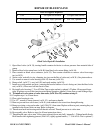
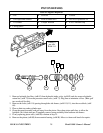
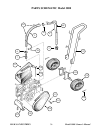
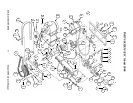
REPAIR OF BLEED VALVE
Bleed Valve Repair Kit Installation
1. Open bleed valve (ref # 34), turning handle counter-clockwise to release pressure from material side of
pump.
2. Remove bleed valve return hose, (ref # 48) from bleed valve return fitting, (ref # 44).
3. Place wrench on bleed valve connector, (ref # 35). Turn counter-clockwise to remove valve from outgo
tee, (ref # 33).
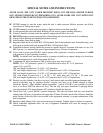
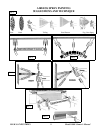
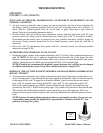
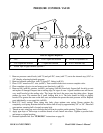
4. Secure valve vertically in vise, clamping vise jaws on the flats of valve nut ( ref # 36 ). See picture above.
5. Use wrench to remove valve housing (ref # 41) from nut, (ref # 36).
6. Remove ball, (ref # 37 ), seat, (ref # 26) and crush washer, (ref # 24).
7. Install new crush washer and seat, ( ensuring the beveled surface of seat is facing out ) into the bleed valve
nut ( ref # 36 ). Place new ball into bevel of seat.
8. Re-install valve housing ( * Use of Teflon Tape or pipe sealant is optional ). Tighten 1/4 turn past finger
tight. If leakage occurs at this junction point during operation, tighten 1/4 turn more or until leakage stops.
9. To install new valve stem, or valve stem seals, (ref # 38 or 39), continue at step 9 .
10. Complete steps 1 to 5 from above.
11. Place valve housing in vise.
12. Use 1/2” wrench to loosen jam nut ( ref # 42 ), and remove handle.
13. Remove jam nut from valve stem ( ref # 40 ), and unthread valve stem down through housing.
14. Remove existing o-ring and washer ( ref # 38 & 39 ) from stem. Replace with new parts, ensuring they are
installed in the correct order on stem. Refer to diagram.
15. Thread stem back into housing until all threads are used. Thread jam nut on to valve stem.
16. Re-assembly valve. Refer to steps 6 to 8 from instructions above.
17. Thread handle onto valve stem. Allow stem to thread down onto ball ( internally ). Tighten handle firmly.
Hold handle while tightening jam nut ( Ref # 42 ) tightly against handle. ( ** Use of Loc-Tite is optional )
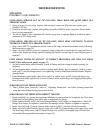
26
24
36
35
42
41
44
40
39
38
37
43
47
Tools or Supplies Required
♦ Vise ♦ 5/8 Open end wrench ♦ 3/4 Open end wrench
♦ 9/16 Open end wrench ♦ Teflon Tape, optional* ♦ Loc-Tite, optional **