


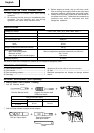


10
English
CAUTION:
⅜ The dust cup and dust collector (B) are for exclusive
use of concrete drilling work. Do not use them for
wood or metal drilling work.
⅜ Insert dust collector (B) completely into the chuck part
of the main unit.
⅜ When turning the hammer drill on while dust collector
(B) is detached from a concrete surface, dust collector
(B) will rotate together with the drill bit. Make sure to
turn on the switch after pressing the dust cup on the
concrete surface. (When using the dust collector (B)
attached to a drill bit that has more than 190 mm of
overall length, dust collector (B) cannot touch the
concrete surface and will rotate. Therefore please use
dust collector (B) by attaching to drill bits which have
166 mm, 160 mm, and 110 mm overall length.
⅜ Dump particles after every two or three holes when
drilling.
⅜ Please replace the drill bit after removing dust collector
(B).
6. Selecting the driver bit
Screw heads or bits will be damaged unless a bit
appropriate for the screw diameter is employed to
drive in the screws.
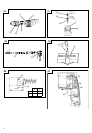
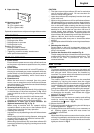
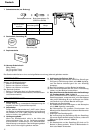
7. Confirm the direction of bit rotation (Fig. 4)
The bit rotates clociwise (viewed from the rear side) by
pushing the R-side of the reversing switch lever. The
L-side of the lever is pushed to turn the bit
counterclockwise.
HOW TO USE
CAUTION:
To prevent accidents, make sure to turn the switch off
and disconnect the plug from the receptacle when the
drill pits and other various parts are installed or
removed. The power switch should also be turned off
during a work break and after work.
1. Switch operation
The rotation speed of the drill bit can be controlled
steplessly by varying the amount that the trigger
switch is pulled. Speed is low when the trigger switch
is pulled slightly and increases as the switch is pulled
more. Continuous operation may be attained by
pulling the trigger switch and depressing the stopper.
To turn the switch OFF, pull the trigger switch again
to disengage the stopper, and release the trigger
switch to its original position.
2. Rotation + striking
This hammer drill can be set to rotation and striking
mode by turning the change lever fully counter-
clockwise to the
mark. (Fig. 5)
(1) Mount the drill bit.
(2) Pull the trigger switch after applying the drill bit tip to
the drilling position. (Fig. 6)
(3) Pushing the hammer drill forcibly is not necessary at
all. Pushing slightly so that drill dust comes out
gradually is sufficient.
CAUTION:
When the drill bit touches construction iron bar, the bit
will stop immediately and the hammer drill will react
to revolve. Therefore grip the side handle and handle
tightly as shown in Fig. 6.
APPLICATIONS
Rotation and striking function
⅜ Drilling anchor holes
⅜ Drilling holes in concrete
⅜ Drilling holes in tile
Rotation only function
⅜ Drilling in steel or wood
(with optional accessories)
⅜ Tightening machine screws, wood screws
(with optional accessories)
PRIOR TO OPERATION
1. Power source
Ensure that the power source to be utilized conforms
to the power requirements specified on the product
nameplate.
2. Power switch
Ensure that the power switch is in the OFF position. If
the plug is connected to a power receptacle while the
power switch is in the ON position, the power tool will
start operating immediately, which could cause a
serious accident.
3. Extension cord
When the work area is removed from the power
source, use an extension cord of sufficient thickness
and rated capacity. The extension cord should be kept
as short as practicable.
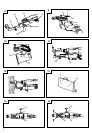
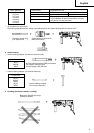
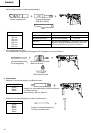
4. Mounting the drill bit (Fig. 1)
(1) To attach a drill bit (SDS-plus shank), fully pull the grip
in the direction of the arrow as shown in Fig. 1 and
insert the drill bit as far as it will go while manually
turning.
(2) By releasing the grip, the drill bit will be secured.
(3) To remove the drill bit, fully pull the grip in the
direction of the arrow and pull out the drill bit.
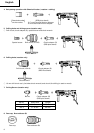
5. Installation of dust cup or dust collector (B)
(Optional accessories) (Fig. 2, Fig. 3)
When using a hammer drill for upward drilling
operations attach a dust cup or dust collector (B) to
collect dust or particles for easy operation.
⅜ Installing the dust cup
Use the dust cup by attaching to the drill bit as shown
in Fig. 2.
When using a bit which has big diameter, enlarge the
center hole of the dust cup with this hammer dirll.
⅜ Installing dust collector (B)
When using dust collector (B), insert dust collector (B)
from the tip of the bit by aligning it to the groove on the
grip. (Fig. 3)
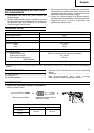
9. Paper dust bag
10. Hammer grease A
500 g (in a can)
70 g (in a green tube)
30 g (in a green tube)
Optional accessories are subject to change without notice.