


5
STANDARD ACCESSORIES
(1) Saw Blade (Dia. 335 mm) .........................................1
(2) Wrench.......................................................................1
(3) Guide..........................................................................1
(4) Wing-bolt ...................................................................1
(5) Riving knife ................................................................1
(6) Hexagon head bolt....................................................2
(7) Adapter ring (for the 30mm dia. saw blade)...........1
Standard accessories are subject to change without notice.
OPTIONAL ACCESSORY (sold separately)
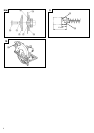
⅜ Dust collection adapter
Connect the suction hose to collect saw dust with the
vacuum cleaner (see Fig. 10).
Optional accessory is subject to change without notice.
APPLICATION
Cutting various types of wood.
PRIOR TO OPERATION
1. Power source
Ensure that the power source to be utilized conforms
to the power requirements specified on the product
nameplate.
2. Power switch
Ensure that the power switch is in the OFF position.
If the plug is connected to a power receptacle while
the power switch is in the ON position, the power
tool will start operating immediately, which could
cause a serious accident.
3. Extension cord
When the work area is removed from the power
source, use an extension cord of sufficient thickness
and rated capacity. The extension cord should be
kept as short as practicable.
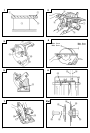
4. Prepare a wooden workbench (Fig. 1)
Since the saw blade will extend beyond the lower
surface of the lumber, place the lumber on a
workbench when cutting. If a square block is utilized
as a workbench, select level ground to ensure it
is properly stabilized. An unstable workbench will
result in hazardous operation.
CAUTION
To avoid possible accident, always ensure that the
portion of lumber remaining after cutting is securely
anchored or held in position.
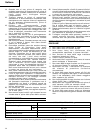
SPECIFICATIONS
Voltage (by areas)* (110V, 220V, 230V, 240V)
Cutting Depth 90° 128 mm
45° 85 mm
Power Input* 2000 W
No-Load Speed 3400/min.
Weight (without cord) 13 kg
* Be sure to check the nameplate on product as it is subject to change by areas.
ADJUSTING THE SAW PRIOR TO USE
1. Adjusting the cutting depth
As shown in Fig. 2 cutting depth adjustment can
be accomplished by loosening clamp lever and
shifting the base. When the base and saw blade
are at a perpendicular angle, use the link scale to
adjust the cutting depth.
Measure the distance that the saw blade extends
to adjust the cutting depth to the correct distance
because the scale marks are only indicated for
reference. After the adjustment is over, securely
tighten the clamp lever.
2. Installing riving knife
(1) Place the base facing upward and loosen the clamp
lever. Lift the base until the depth of cut on the
main unit reaches the minimum state, fasten the
clamp lever, and secure the base. (Fig. 2)
(2) Install the riving knife to the arm securely with the
2 attached bolts. (Fig. 3)
3. Adjusting the riving knife
Loosen the hexagon head bolts used to clamp the
riving knife, adjust the riving knife to the position
shown in Fig. 4 and securely retighten the bolts.
After adjustment, ensure that the riving knife moves
by following the adjusted cutting depth.
4. Adjusting the angle of inclination
As shown in Fig. 5 by loosening the wing bolt on
the scale and the wing bolt (Fig. 2) on the rear
of the base, the saw blade may be inclined to a
maximum angle of 45° in relation to the base.
Always ensure that the wing bolts are securely
tightened after making the desired adjustment.
5. Adjusting the guide (Fig. 6)
The cutting position can be adjusted by moving the
guide to the left or right after loosening its wing
bolt. The guide can be mounted on either the right
or left side of the base.
CUTTING PROCEDURES
1. Place the saw body (base) on the lumber and align
the premarked line of cut with the saw blade, using
the carved line at the front of the base. Align with
the premarked line on the right when not inclined,
and at the premarked line on the left at 45° inclined.
(Fig. 6)
2. Ensure that the switch is turned to the ON position
before the saw blade comes in contact with the
lumber. The switch is turned ON when the trigger
is squeezed; and OFF when the trigger is released.
English