


English
13
NOTE:
If the sleeve becomes loose during operation, tighten
it further.
The tightening force becomes stronger when the
sleeve is tightened.
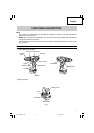
2. Dismounting the bit
Firmly grasp the ring and loosen the sleeve by
turning it toward the left (in the counterclockwise
direction as viewed from the front) (See Fig. 5).
CAUTION:
When mounting a bit into the keyless chuck, tighten
firmly. If the sleeve is not tight, the bit may slip or
fall out, causing injury.
NOTE:
Loosening stuck or hard to move sleeves.
Grasp the bit installed in the keyless chuck, in a vise
or similar tool.
Set the clutch dial position to “1-11” and turn on
the switch. The motor then starts.
Finally, rotate the sleeve to the left, and it will loosen.
3. Confirm that the battery is mounted correctly.
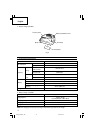
4. Check the rotational direction.
The bit rotates clockwise (viewed from the rear side)
by pushing the R-side of the selector button.
The L-side of the selector button is pushed to turn
the bit counterclockwise (See Fig. 6).
(The
L
and
R
marks are provided on the body.)
⅜
When the trigger switch is depressed, the tool
rotates. When the trigger is released, the tool stops.
⅜
The rotational speed of the drill can be controlled
by varying the amount that the trigger switch is
pulled. Speed is low when the trigger switch is pulled
slightly and increases as the trigger switch is pulled
more.
⅜
When releasing the trigger of the switch, the brake
will be applied for immediate stopping.
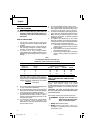
Fig. 6
R
L
Selector
button
R
marks
L
marks
Trigger
switch
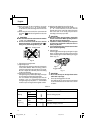
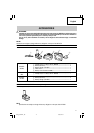
5. Change rotation speed.
Operate the shift knob to change the rotational
speed. Move the shift knob in the direction of the
arrow (see Figs. 7 and 8).
When the shift knob is set to “LOW”, the drill rotates
at a low speed. When set to “HIGH”, the drill rotates
at a high speed.
CAUTION:
●
When changing the rotational speed with the shift
knob, confirm that the switch is off.
Changing the speed while the motor is rotating will
damage the gears.
●
When a large force is required for operation
(operations indicated in the following chart) set the
shift knob to “LOW”. If “HIGH” is set and the unit is
used, it may cause the motor to burn out or
malfunction prematurely.
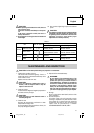
6. Confirm the clutch dial position (see Fig. 9).
The tightening torque of this unit can be adjusted
according to the clutch dial position, at which the
clutch dial is set.
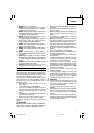
Fig. 7
Fig. 8
Shift knob
Shift knob
High speed
Low speed
Clutch dial
Fig. 9
Weak
mark
Triangle mark
Strong
01Eng_DS10DFL_US 1/7/09, 12:2613