


English
14
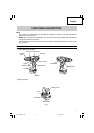
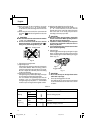
(3) Adjusting the tightening torque (See Fig. 9)
Rotate the clutch dial and line up the numbers “1, 3,
5, ... 21” on the clutch dial, or the dot, with the
triangle mark on the outer body. Adjust the clutch
dial in the weak or the strong torque direction
according to the torque you need.
CAUTION:
●
The motor rotation may be locked to cease while
the unit is used as drill. While operating the driver
drill, take care not to lock the motor.
●
If the motor is locked, immediately turn the power
off. If the motor is locked for a while, the motor or
battery may be burnt.
●
Too long hammering may cause the screw broken
due to excessive tightening.
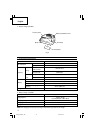
8. Using the light
Pull the trigger switch to light up the light. The light
keeps on lighting while the trigger switch is being
pulled. The light goes out after releasing the trigger
switch. (Fig. 11)
CAUTION:
Do not look directly into the light. Such actions
could result in eye injury.
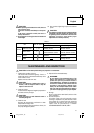
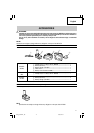
9. The scope and suggestions for uses
The usable scope for various types of work based
on the mechanical structure of this unit is shown
in Table 4.
(1) When using this unit as a screwdriver, line up the
one of the numbers “1, 3, 5 ... 21” on the clutch dial,
or the black dot, with the triangle mark on the outer
body.
(2) When using this unit as a drill, line up the clutch dial
drill mark “ ” with the triangle mark on the outer
body.
CAUTION:
●
The clutch dial cannot be set between the numbers
“1, 3, 5 ... 21” or the black dot.
●
Do not use with the clutch dial set at the line
between the number “21” and the drill mark “ ”.
Doing so may cause damage (See Fig. 10).
7. Tightening torque adjustment
(1) Tightening torque
Tightening torque should correspond in its intensity
to the screw diameter. When too strong power is
used, the screw head may be broken or be injured.
Be sure to adjust the clutch dial position according
to the screw diameter.
(2) Tightening torque indication (See Fig. 9)
The tightening torque differs depending on the type
of screw and the material being tightened.
The unit indicates the tightening torque with the
numbers “1, 3, 5 ... 21” on the clutch dial, and a dot.
The tightening torque at position “1” is the weakest
and the torque is strongest at the highest number.
Fig. 11
Trigger switch
Light
Work
Clutch dial position
Suggestions
Wood
Drilling Steel Use for drilling purpose.
Aluminum
Small
1 – 21
Use the bit and socket matching the screw
Screw
screw diameter.
tightening
Wood
1 –
Use after drilling a pilot hole.
screw
Table 4
mark
Triangle mark
Line
Fig. 10
01Eng_DS10DFL_US 1/7/09, 12:2614