


OM-198 683 Page 11
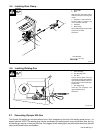
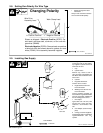
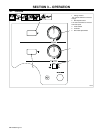
2-5. Installing Work Clamp
1 Work Cable
2 Boot
Slide boot onto work cable. Route
cable out front panel opening from
inside.
3 Negative (–) Output Terminal
Connect cable to terminal and
cover connection with boot.
4 Hardware
5 Work Clamp
Route cable through clamp handle
and secure as shown.
Close door.
802 474-A
Tools Needed:
1/2, 3/4 in
3
2
1
5
4
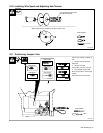
2-6. Installing Welding Gun
1 Drive Assembly
2 Gun Securing Knob
3 Gun End
Loosen securing knob. Insert gun
end through opening until it bottoms
against drive assembly (make sure
gun end does not touch drive rolls).
Tighten knob.
4 Gun Trigger Plug
Insert plug into receptacle, and
tighten threaded collar.
Close door.
Ref. 802 064-A
1
3
4
2
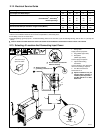
2-7. Connecting Olympic 30A Gun
The Olympic 30A welding gun connects directly to the 10-pin receptacle on the front of the welding power source – no
adapter required. NOTE: Two welding guns may be connected to the welding power source at the same time, but only
one welding gun may be in use at any one time. If the triggers of both welding guns are pulled at the same time, the weld
output and wirefeed motor are disabled.