


3
IMPORTANT SAFETY REMINDERS
This polisher should only be used for domestic polishing of hard floor surfaces as
described in these instructions. Please ensure that these are fully understood before
operating this appliance.
This polisher must not be used for floor washing.
This Hoover suction polisher must be connected to an electricity supply at the
voltage shown on the rating plate, found on the underside of the polisher.
Appliances showing a rating plate voltage of 230V- 240V can be connected to
electrical sources of 220V.
This product is double insulated and must not be earthed.
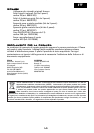
IMPORTANT: The wires in the power cord are coloured in accordance with the fol-
lowing code:
Blue - Neutral Brown - Live
13 Amp fused plug on UK versions only.
GETTING STARTED
By following this step-by-step guide your new Hoover polisher will be ready
for use:
Remove polisher and accessories from packaging. Please dispose of
the packaging in a safe and environmentally conscientious way.
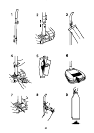
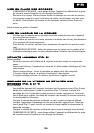
HANDLE ASSEMBLY
Join together the 2 handle sections ensuring that the stud locates in the hole
(Fig.1).
Fit the handle into the socket at the rear of the hood and push until it locates
in the hole (indicated by a "click") (Fig. 2).
OUTER BAG ASSEMBLY
Attach bag support to the hook positioned under the hand grip (Fig. 3).
Once the bag support is attached, insert plastic flange at the bottom of bag
into the opening located at the rear of the hood (Fig. 4).
FITTING THE PAPER DUST BAG
(Depending on model)
Refer to the following instructions for models equipped with paper
dust bag:
1) Open fastener on outer bag to the fullest extend to expose the
air-duct.
2) Fit paper dust bag by pushing the cardboard collar on the air-duct (Fig. 5).
3) Tuck paper dust bag into the outer bag and fully close the zip fastener.
GB