


4
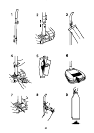
FITTING BRUSHES
SAFETY WARNING: The polisher must be switched off and the plug
disconnected from the electrical supply before fitting or changing the
brushes.
Turn the polisher upside down. Place each brush or pad on its axle and
press until a click indicates that it is the correct position. To remove
brushes or pads, grasp them and pull towards you.
Your polisher is now ready for use.
SWITCHING THE POLISHER ON
Ensure the handle is in the upright position before inserting the plug
into the electricity supply.
To start the polisher push the handle down then lower it into the
working position.
To stop the polisher simply return handle to the upright position.
SAFETY WARNING: Do not run over main leads to avoid damage to
the electrical insulation.
INDICATOR LIGHTS (FIG. 6)
(Depending on model)
Some polishers will have 4 indicator lights on the front panel:
Green light on: the appliance is connected to the electricity supply
Red light on: paper dust bag needs changing
1 orange light on: motor running at low speed
2 orange lights on: motor running at normal speed
ADJUSTING BRUSH SPEED (FIGS 6 & 7)
(Depending on model)
Models equipped with 4 indicator lights on panel (Fig. 6), are supplied
with a 2 - position foot switch (Fig. 7). During the wax-spreading
phase with the Yellow or Black brushes, press the foot switch to
reduce brush rotation speed, reduce noise level and save energy.
When the rotation speed is low one Orange light is illuminated
When the wax-spreading operation is finished, press the foot switch
(Fig. 7) to return to high speed and start the polishing phase.
When the rotation speed is high two Orange lights are illuminated
SAFETY WARNING: The polisher must be switched off and the plug
disconnected from the electrical supply before fitting or changing the
brushes.
GB