


desenrrollar suficientes clavos hasta
alcanzar el trinquete de avance.
El primer clavo debe colocarse
delante del diente delantero en el
trinquete de avance, en el canal
del expulsador y las cabezas de los
clavos deben estar en la ranura de la
nariz del clavador.
5. Cierre el retén y la
tapa del cargador.
6. Para descargarla haga lo contrario
que para cargarla, excepto que
siempre debe desconectar
la manguera de aire antes de
comenzar.
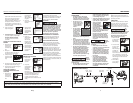
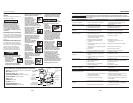
AJUSTE DE LA GUIA PARA TEJAS DE
MADERA
1. Desconecte la
clavadora de
la fuente de
suministro de
aire.
2. Afloje los
dos tornillos de la guía que se
encuentran bajo el cargador.
3. Coloque la guía
contra el borde
delantero de la
teja.
4. Ajuste la guía de tejas hasta lograr la
exposición deseada para la teja.
5. Apriete los dos tornillos de la guía
para tejas de madera.
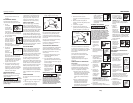
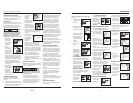
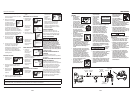
QUE HACER CUANDO LA
CLAVADORA TENGA UN CLAVO
ATASCADO
1. Desconecte la
clavadora de
la fuente de
suministro de
aire.
2. Tire el retén de
la portezuela
hacia abajo y
abra la tapa del
cargador.
3. Saque los
clavos de la nariz del
clavador.
4. Sujete el clavo
atascado con
unas pinzas y
extráigalo del
clavador.
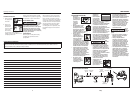
METODO ALTERNO:
1. Inserte un
destornillador
en la nariz
del clavador.
Empuje hacia
arriba la hoja
del expulsador a fin de liberar el
clavo atascado.
2. Sujete el clavo
con unas pinzas
y sáquelo del
clavador.
Mantenimiento
LIMPIEZA DEL CLAVADOR
1. Desconectar
el suministro
de aire del
clavador.
2. Limpie las
acumulaciones
de alquitrán
con aceite
combustible
kerosén #2 o
con combustible diesel. No permita
que el combustible penetre en
el cilindro del expulsador pues
se puede causar daño. Seque
completamente el clavador antes de
usarlo.
O
x
y
g
e
n
N
i
t
r
o
g
e
n
H
y
d
r
o
g
e
n
C
a
r
b
o
n
D
i
o
x
i
d
e
O
I
L
D
A
I
L
Y
O
x
y
g
e
n
N
i
t
r
o
g
e
n
H
y
d
r
o
g
e
n
C
a
r
b
o
n
D
i
o
x
i
d
e
O
I
L
D
A
I
L
Y
O
x
y
g
e
n
N
i
t
r
o
g
e
n
H
y
d
r
o
g
e
n
C
a
r
b
o
n
D
i
o
x
i
d
e
O
I
L
D
A
I
L
Y
SERVICIO TÉCNICO
Si desea hacer alguna pregunta
referente a la reparación u operación de
las clavadoras, sírvase llamar a nuestro
número especial, 1-800-543-6400.
REPUESTOS
Use solamente partes de repuesto Husky
originales. Nunca substituya las partes.
No use partes modifi cadas o partes que
no den un rendimiento equivalente al
equipo original. El rendimiento de las
herramientas, la seguridad y la duración
pueden verse reducidos. Cuando ordene
partes de repuesto o sujetadores,
especifi que el número de la parte.
PARA REPARAR LA CLAVADORA
Las reparaciones de la clavadora las
debe hacer SOLAMENTE un técnico
calificado que tenga experiencia.
PARA COLOCARLE LOS SELLOS
Cada vez que repare una clavadora
deberá limpiarle y lubricarle las partes
internas. Le recomendamos que
use Parker O-lube o un lubricante
equivalente en todos los anillos en O.
A cada anillo en O se le debe dar un
baño de lubricante para anillos antes de
instalarlos. Igualmente, deberá ponerle
un poco de aceite a todas las piezas
que se mueven y muñones. Finalmente,
después de haberla ensamblado y
antes de probar la herramienta deberá
ponerle unas cuantas gotas de aceite sin
detergente 30W u otro aceite similar, en
las líneas de aire.
INFORMACIÓN DE INTERCAMBIO
Los clavos usados con la clavadora para acabado HDN16450 de Husky también se pueden usar con las clavadoras Rollo de
techado ATRO, Bostitch RN45, N12B, Hitachi NV45AB, Porter Cable RN175, Sears 18324 y Senco SCN200R.
Manual de Instrucciones de Operación
Funcionamiento (Continued)
22-Sp
O
x
y
g
e
n
O
x
y
g
e
n
N
i
t
r
o
g
e
n
N
i
t
r
o
g
e
n
H
y
d
r
o
g
e
n
H
y
d
r
o
g
e
n
C
a
r
b
o
n
D
i
o
x
i
d
e
C
a
r
b
o
n
D
i
o
x
i
d
e
SHINGLE EXPOSURE
Exposición para la teja
O
x
y
g
e
n
N
i
t
r
o
g
e
n
H
y
d
r
o
g
e
n
C
a
r
b
o
n
D
i
o
x
i
d
e
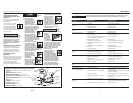
discharge of nails. Never point
the nailer at anyone. Accidental
triggering of the nailer could result
in death or serious personal injury.
• Do not drive a nail
on top of other nails.
The nail could glance
and cause death or
a serious puncture
wound.
• Do not operate
or allow anyone
else to operate
the nailer if any
warnings or
warning labels
are not legible.
Warnings or warning labels are
located on the nailer magazine and
body.
• Never leave the nailer unattended
or connected to an air compressor
when not in use. Serious personal
injury can occur if someone picks up
and uses the nailer without knowing
the correct way to operate the nailer.
• Do not drop or throw the tool.
Dropping or throwing the tool can
result in damage that will make
the tool unusable or unsafe. If the
tool has been dropped or thrown,
examine the tool closely for bent,
cracked or broken parts and air
leaks. STOP and repair before using
or serious injury could occur.
Caution
indicates
a potentially hazardous situation which,
if not avoided, MAY result in minor or
moderate injury.
• Do not modify or alter the nailer or
any nailer parts. Do not use the
!
WARNING
3
HDN16450AV
General Safety Information
(Continued)
nailer if any shields or guards are
removed or altered. Do not use the
nailer as a hammer. Personal injury
or tool damage may occur.
• Avoid long extended periods of work
with the nailer. Stop using the nailer
if you feel pain in hands or arms.
• Always check that
the Work Contact
Element (WCE) is
operating properly. A
nail could accidentally
be driven if the
WCE is not working
properly. Personal injury may occur
(See "Checking the Work Contact
Element" Section).
• Disconnect air supply and release
tension from the pusher before
attempting to clear jams because
fasteners can be ejected from the
front of the nailer. Personal injury
may occur.
Notice
indicates
important information, that if not
followed, may cause damage to
equipment.
• Avoid using the nailer when the
magazine is empty. Accelerated wear
on the nailer may occur.
• Clean and check all air supply hoses
and fittings before connecting the
nailer to an air supply. Replace any
damaged or worn hoses or fittings.
Tool performance or durability may
be reduced.
• Air compressors providing air
to the nailer should follow the
requirements established by the
American National Standards
Institute Standard B19.3-1991;
Safety Standard for Compressors
for Process Industries. Contact your
air compressor manufacturer for
information.
Operation
Read this manual and understand all
safety warnings and instructions before
operating the nailer.
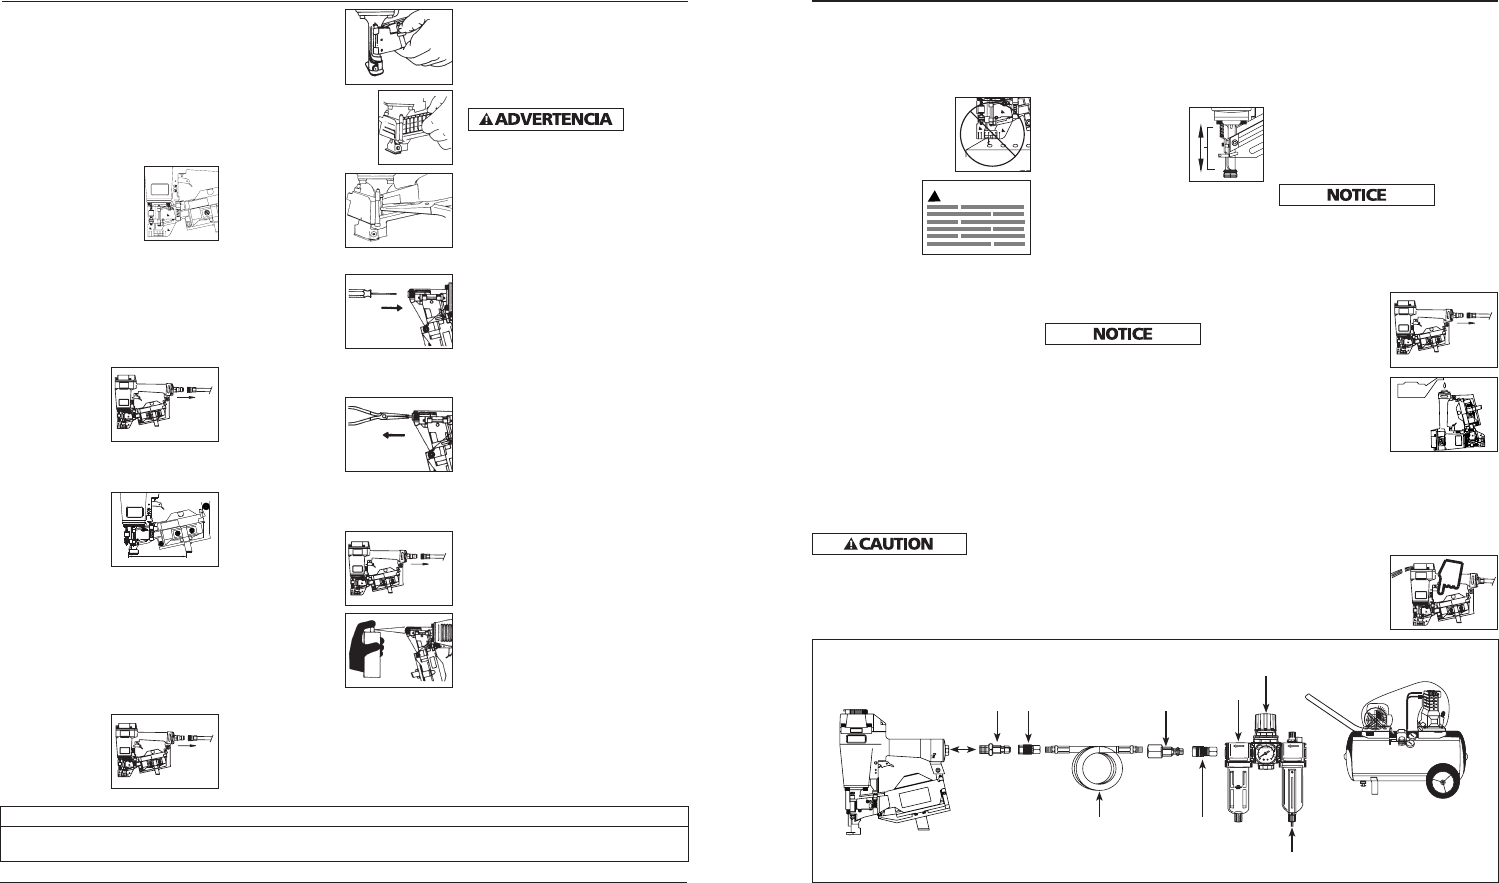
LUBRICATION
This nailer requires lubrication before
using the nailer for the first time and
before each use. If an inline oiler is
used, manual lubrication through the
air inlet is not required on a daily basis.
The
work
surface can become damaged by
excessive lubrication. Proper lubrication
is the owner’s responsibil- ity. Failure
to lubricate the nailer properly will
dramatically shorten the life of the
nailer and void your warranty.
1. Disconnect the
air supply from
the nailer to
add lubricant.
2. Turn the nailer
so the air inlet
is facing up.
Place 4-5 drops
of 30 W non-
detergent oil
into air inlet. Do not use detergent
oils, oil additives, or air tool oils.
Air tool oils contain solvents which
will damage the nailer's internal
components.
3. After adding
oil, run nailer
briefly. Wipe
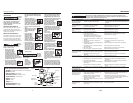
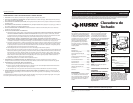
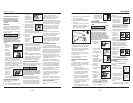
Recommended Hookup
Quick
Plug
Quick
Coupler
Quick Plug
(Optional)
Oiler
Regulator
Air
Hose
Quick
Coupler
(Optional)
Filter
O
x
y
g
e
n
N
i
t
r
o
g
e
n
H
y
d
r
o
g
e
n
C
a
r
b
o
n
D
i
o
x
i
d
e
O
I
L
D
A
I
L
Y
O
I
L
D
A
I
L
Y
O
x
y
g
e
n
N
i
t
r
o
g
e
n
H
y
d
r
o
g
e
n
C
a
r
b
o
n
D
i
o
x
i
d
e
OIL
O
x
y
g
e
n
N
i
t
r
o
g
e
n
H
y
d
r
o
g
e
n
C
a
r
b
o
n
D
i
o
x
i
d
e
O
I
L
D
A
I
L
Y