


Manual de Instrucciones y Lista de Piezas HDS550
Lista De Repuestos
Puede escribirnos a:
Campbell Hausfeld
Attn: Parts Department
100 Production Drive
Harrison, OH 45030
Sirvase darnos la siguiente información:
- Número del modelo
- Código estampado en la unidad
- Descripción y número del repuesto según la lista de repuestos
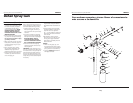
1 Conjunto de boquilla de aire DH067300AV 1
2 Boquilla de líquido ▲ DH067400AV 1
3 Gatillo ● 1
4 Cuerpo de pistola no disponible 1
5 Empaque de válvula de aire ■ ◆ 2
6 Tuerca de empaque de válvula de aire ■ ◆ 1
7 Conjunto de vástago de válvula de aire ■ 1
8 Resorte de válvula de aire ■ 1
9 Entrada de aire ■ 1
10 Empaque de aguja de líquido ▲ ◆ 2
11 Tuerca de empaque ▲ 1
12 Tornillo de gatillo ● 1
14 Conjunto de aguja de líquido ▲ 1
15 Resorte de control de líquido ▲ 1
16 Perilla de control de líquido ▲ 1
17 Pasador del control de patrón ❍ 1
18 Arandela del control de patrón ❍ ◆ 1
19 Resorte del control de patrón ❍ 1
20 Aro de empaque del control de patrón ❍ ◆ 1
21 Empaque del control de patrón ❍ ◆ 1
No. Número
de del
Ref. Descripción Repuesto Ctd.
22 Tuerca del control de patrón ❍ 1
23 Perilla del control de patrón ❍ 1
24 Conjunto de tubo de material ❒ 1
25 Yugo ❒ 1
26 Palanca de regulación ❒ 1
27 Cubierta de taza ❒ 1
28 Tuerca ❒ 1
29 Empaquetadura (paquete de 3) DH067500AV 1
30 Bote DH067600AV 1
JUEGOS DE SERVICIO (contienen uno de cada componente,
salvo que se indique otra cantidad)
■ Juego de válvula de aire (cant. 2 – No. 5) DH550100AV
▲ Juego de control de líquido DH550200AV
(cant. 2 – No. 10)
❍ Conjunto de control de patrón DH550300AV
◆ Juego de empaquetaduras DH550400AV
(cant. 2 – No. 5 y No. 10)
● Juego de gatillo DH550500AV
❒ Conjunto de yugo DH550600AV
No. Número
de del
Ref. Descripción Repuesto Ctd.
22 Sp
3
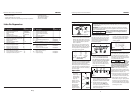
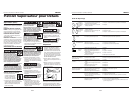
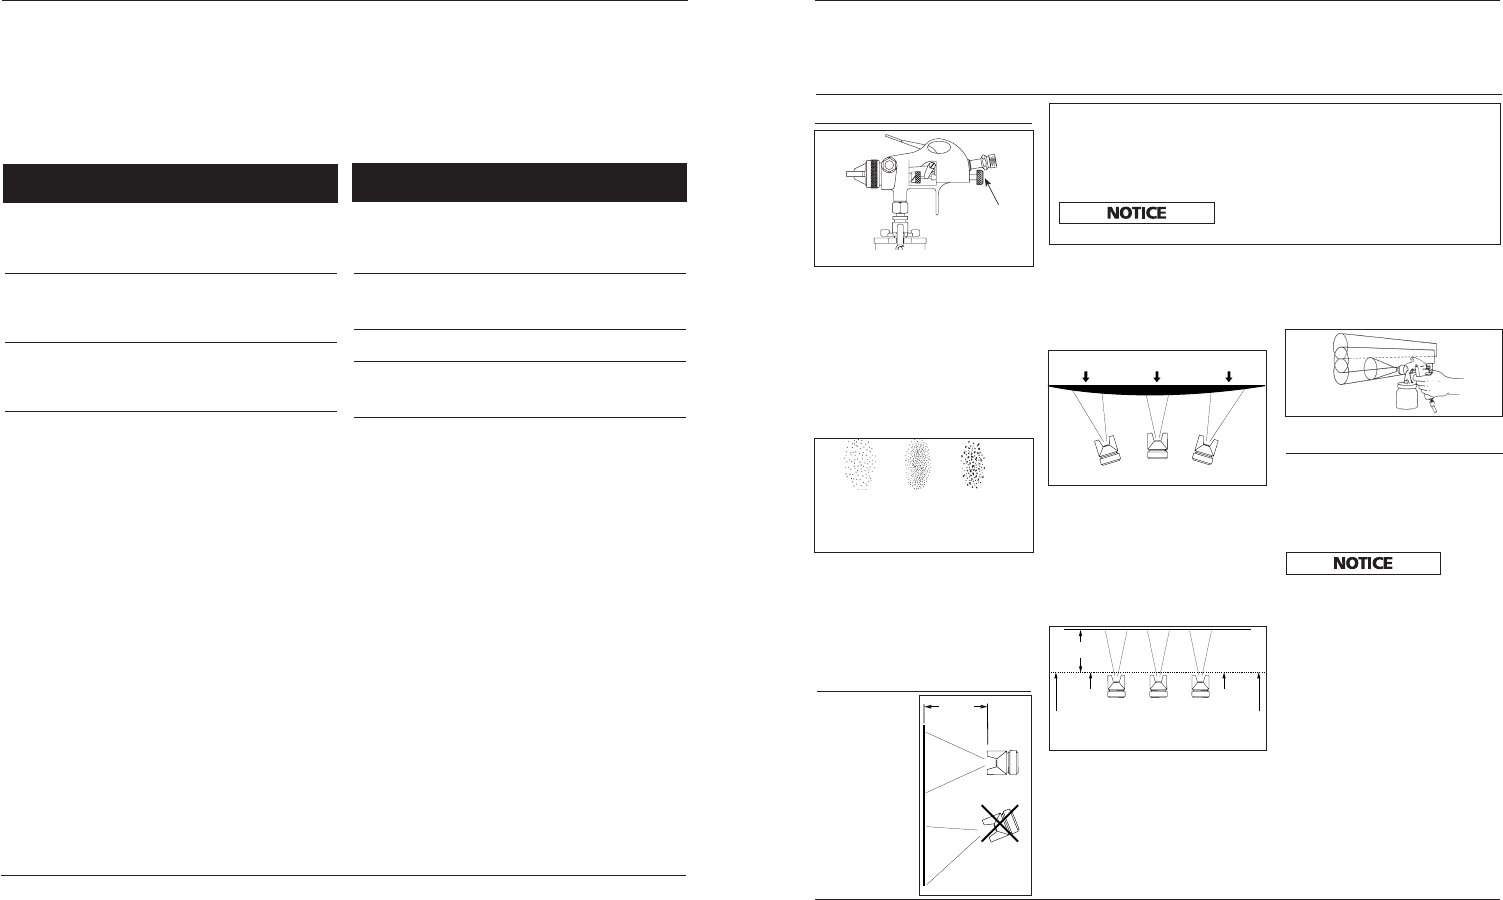
3. Trigger a short burst while turning
fluid control knob counterclockwise.
Observe the spray pattern on the tar-
get and adjust the fluid control knob
until the desired pattern (atomiza-
tion) is obtained.
If the spray is too fine (excessive over-
spray), caused by too much air for the
amount of paint being sprayed, reduce
the air pressure or open the fluid con-
trol to spray more material.
If the spray is too coarse (spitting globs),
reduce the amount of material with the
fluid control knob or thin the paint.
Before spraying the workpiece, practice
a few minutes on a cardboard target to
ensure the pattern size and consistency
are set correctly.
Operation
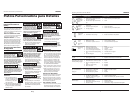
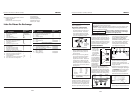
1. Begin spray-
ing. Always
keep the gun at
right angles to
the work. (See
Figure 4.)
Keep the nozzle
about 6 to 9 inches
from the work
surface through-
out the stroke
and always keep
the gun in motion
while spraying. Stopping gun movement
in mid-stroke will cause a build up of paint
and result in “runs.” Do not “fan” the gun
from side to side while painting. This will
cause a build-up of paint in the center of
the stroke and an insufficient coating at
each end (See Figure 5).
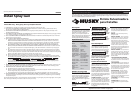
2. “Trigger” the gun properly. Start
the gun moving at the beginning
of the stroke BEFORE SQUEEZING
THE TRIGGER and release the trigger
BEFORE STOPPING GUN MOVEMENT
at the end of the stroke. This pro-
cedure will “feather” (blend) each
stroke with the next without show-
ing overlap or unevenness).
3. The amount of paint being applied
can be varied by the speed of the
stroke, distance from the surface and
adjustment of the fluid control knob.
4. Overlap strokes just enough to
obtain an even coat. NOTE: Two
thin coats of paint will yield better
results and have less chance of runs
than one heavy layer.
5. Use a piece of cardboard as a shield
to catch overspray at the edges of
the work to protect other surfaces.
Use masking tape to cover other
areas if needed.
Maintenance
DAILY CLEAN-UP
Local codes may require specific clean-
ing methods and equipment. Follow
local codes and manufacturer’s recom-
mendations for the use and disposal of
spray materials and solvent.
Clean
spray gun
immediately after use. Paint and other
material dry quickly in the small pas-
sages rendering gun useless due to the
difficulty of removing hardened paint
from the passages inside the gun.
NOTE: In the instructions below, the
use of the word “solvent” refers to the
specific solvent for the material used (eg:
lacquer thinner for lacquer, etc ).
1. Remove and empty the canister; then
rinse with a solvent recommended
for the paint or other material used.
2. Refill canister with clean solvent
and attach to the gun. Spray solvent
through the gun while shaking the
gun vigorously. Wipe the gun exteri-
or with a solvent soaked rag. Repeat
until the gun is clean.
WATER/OIL IN COMPRESSED AIR
All compressor pumps discharge some condensed water, oil or contaminates with
the compressed air.
IMPORTANT: This condensation will cause “fish eyes” to appear in the paint
job. Install appropriate water/oil removal equipment and controls as necessary
for the intended application.
Failure to install appropriate water/oil removal
equipment may result in damage to machinery
or workpiece.
Operating Instructions and Parts Manual HDS550
6 - 9”
Figure 4
Thin coat Thin coat
Heavy coat
Figure 5
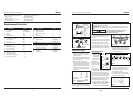
INCORRECT
Correct
Paint too
coarse
Paint too
fine
Figure 3 - Pattern Consistency
(Atomization)
6 - 9”
Pull
Trigger
Start
Stroke
Release
Trigger
End
Stroke
Figure 6
Figure 7
Preparation (Cont.)
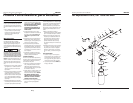
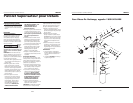
Figure 2 - Adjustment on Spray Gun
Fluid Control
Knob