M35
MAINTENANCE SECTION
41
4.
5.
6.
7.
8.
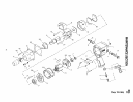
The End Plate Dowel (26) will be free to move when
the the Front End Plate (25) clears the Housing. Do
not lose it.
Remove the Rear End Plate Gasket (20).
Slide the Front End Plate and Front Rotor Bearing (27)
from the Rotor.
Remove the Cylinder Dowel (24), Cylinder (23) and
Vanes (22) from the Rotor.
Using snap ring pliers, remove the Rear Rotor Bearing
Retainer (17) and slide the Rear End Plate (19) and
Rear Rotor Bearing (18) from the Rotor.
If the Front Rotor Bearing or Rear Rotor Bearing
requires replacement, press it from the End Plate with
an arbor press.
Disassembly of the Throttle Mechanism
1.
2.
3.
Unscrew the Inlet Bushing (8) and remove the Exhaust
Deflector (7), Throttle Valve Spring (6) and the
Throttle Valve (3).
The Trigger (2) will be free to fall out of the
Housing when the Throttle Valve is removed.
Do not lose it.
If the Throttle Valve Seat (5) requires replacement,
insert a hooked tool through the center of the Valve
Seat. Catching the backside of the Seat with the hook,
pull the Seat from the Housing.
Remove the two Housing Plate Screws (11) and the
Housing Plate (9) if the Housing Plate Gasket (10)
needs to be replaced.
ASSEMBLY
General Instructions
1.
Always press on the
inner
ring of a ball-type bearing
when installing the bearing on a shaft.
2.
Always press on the
outer
ring of a ball-type bearing
when pressing the bearing into a bearing recess.
3.
Whenever grasping a tool or part in a vise, always use
leather-covered or copper-covered vise jaws. Take
extra care with threaded parts and housings.
4.
Always clean every part and wipe every part with a
thin film of oil before installation.
5.
Apply a film of G-ring lubricant to all G-rings before
final assembly.
Assembly of the Throttle Mechanism
1.
2.
3.
4.
5.
6.
If the Housing Plate (9) was removed, position the
Housing Plate Gasket (10) and Housing Plate, convex
side first, against the Motor Housing (1). Apply
Vibra-TiteB** to the two Housing Plate Screws (11)
and secure the Plate and the Gasket with the Screws.
Tighten the Screws to 20 to 25 in-lb (2 to 3 Nm)
torque.
If the Throttle Valve Seat (5) was removed, drop the
Seat into the air inlet chamber in the handle. Install a
new Throttle Valve Seat by pushing it into position
against the shoulder in the air inlet chamber with a 5/8”
(16 mm) dowel.
Wipe the stem of the Trigger Assembly (2) with some
light grease and insert the stem into the trigger
bushing.
Installation of the Throttle Valve (3) is sometimes a bit
tricky due to the smallness of the Valve and the depth
of the bore in which it is located. The difficult part is
in holding the Valve while inserting the long end of the
valve stem through the hole in the trigger stem.
Although the Valve can be held with a push-button
mechanical pencil or a wooden dowel, one of the
easiest ways of holding it is by using a common
wooden pencil with a rubber eraser. Insert the short
end of the valve stem into the rubber eraser, as far as
possible, and then back it out until the Valve is
just
nicely supported. Insert the Valve into the bore of the
handle so that the long end of the stem enters the hold
in the trigger stem. Pull outward on the Trigger to hold
the Valve while removing the pencil.
Install the Throttle Valve Spring (6), small end first.
Position the Exhaust Deflector (7) in the recess at the
bottom of the handle and install the Inlet Bushing (8).
Tighten the Bushing to 40 to 45 ft-lb (54 to 61 Nm)
torque.
Assembly of the Reverse Valve
1. After applying G-ring lubricant to the Reverse Valve
Seals (14), install them in the undercuts in the reverse
valve bushing. Make certain they are properly seated.
2. Dampen the Reverse Valve (13) with IRAX No. 50 Oil.
With the tool in an upright position, and while facing
the back end of the tool, insert the Reverse Valve from
left to right into the reverse valve bushing.
**
Registered trademark of ND Industries.
7


