M35
MAINTENANCE SECTION
41
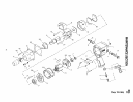
3. Place the Reverse Valve Knob (15) on the end of the
Valve and, after applying LoctiteB No. 601 to the
Reverse Valve Knob Screw (16), fasten the Knob to the
Valve with the Screw. Tighten the Knob Screw to 5 to
6 ft-lb (6.75 to 8.15 Nm) torque.
Assembly of the Motor
1.
2.
3.
7.
8.
9.
Using a sleeve that will contact only the outer ring of
the bearing, press the Front Rotor Bearing (27) into the
Front End Plate (25) and the Rear Rotor Bearing (18)
into the Rear End Plate (19).
Slip the Font End Plate and Bearing over the splined
hub of the Rotor (21).
Grasp the splined end of the Rotor in leather-covered
or copper-covered vise jaws with the Rotor in a
vertical position.
Dampen each Vane (22) with IRAX No. 50 Oil and
insert a Vane into each vane slot in the Rotor.
Set the Cylinder (23) over the Rotor and onto the Front
End Plate.
Slide the Rear End Plate and Bearing onto the Rotor
hub and against the Cylinder.
Using snap ring pliers, install the Rear Rotor Bearing
Retainer (17) in the groove on the rotor hub.
Align the dowel hole in both End Plates with the one
through the Cylinder, and insert a guide rod 3/16”
diameter x 8” long (4.7 mm diameter x 203 mm long)
through the holes. Allow the rod to protrude about
3-l/2” (89 mm) from the Rear End Plate.
While holding the assembled motor intact, remove it
from the vise.
10. Insert the protruding end of the guide into the cast slot
at the bottom of the Motor Housing bore and slide the
assembled motor along the rod until it is completely
seated in the housing.
11. Remove the guide rod and install the Cylinder Dowel
(24).
12. Install the End Plate Dowel (26).
13. Grasp the handle of the Motor Housing in
leather-covered or copper-covered vise jaws with the
open end of the Motor Housing upward.
14. Place a Motor Clamp Washer (28), concave side first,
down over the hub of the Front End Plate so that the
outer rim of the Washer contacts the Front End Plate.
Place the second Motor Clamp Washer, convex side
15.
16.
first, down over the hub of the Front End Plate so that
the inner rims of both Washers are in contact but the
outer rims are separated.
Place the Motor Retainer (29), small bore first, down
over the hub of the Front End Plate and against the
outer rim of the second Motor Clamp Washer.
Place the Rear Hammer Frame Washer (35), hub side
first, over the hub of the Rotor and against the Front
Rotor Bearing.
Assembly of the Impact Mechanism
1.
2.
3.
4.
Coat the Hammer (38) with a light film of IRAX
No. 100 Grease.
Slide the Hammer into the Hammer Frame (36) exactly
as it was when you marked it prior to disassembly.
In order to utilize both impacting surfaces on the
Hammer and thus equalize the wear on each
hammer jaw, the Hammer can be flipped over so
that the arrow is pointing downward.
Replace the Hammer Pins (37).
Examine the base of the Anvil (39) and note its
contour. While looking down through the Hammer
Frame, swing the Hammer to its full extreme one way
or another until you can match the contour of the
Anvil. Enter the Anvil into the Hammer Frame and
through the Hammer.
Assembly of the Tool
1. Set the assembled impact mechanism down over the
splined hub of the Rotor.
2. Position the Hammer Case Gasket (30) on the Housing.
3. Work approximately 12 to 15 cc of IRAX No. 100
Grease into the impact mechanism.
4. Smear a thin film of IRAX No. 100 Grease on the
inside surface of the Hammer Case Bushing (32), and
place the Hammer Case (3 1) down over the Anvil and
against the Motor Retainer.
5. Install the Hammer Case Cap Screws (33) and tighten
them to 20 to 25 ft-lb (27 to 34 Nm) torque.
6. Remove the Impact Wrench from the vise and inject
2 to 4 cc of IRAX No. 100 Grease into the Grease
Fitting (12).
8


