


10
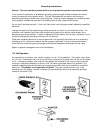
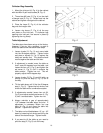
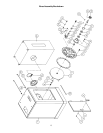
Collector Bag Assembly
1. Mount the inlet port (A, Fig. 4) to the cabinet
with four M6x12 pan head screws (B, Fig. 4).
2. Thread two M6 nuts (C, Fig. 4) on the shaft
of hanger rods (D, Fig. 4). Thread rods into the
cabinet and tighten nuts against the cabinet.
3. Place the loops (E, Fig. 4) of the collector
bag onto the hanger rods.
4. Loosen ring clamp (F, Fig. 4) all the way
and place on the inlet port. Fit collector bag
opening onto inlet port, and secure in place by
tightening the ring clamp.
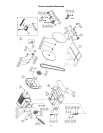
Table Adjustment
The table stops have been set-up at the factory.
However, if you run into a problem, or want to
check the table follow the below listed steps.
1. Loosen knobs (G, Fig. 5) and move table
into the 90-degree position. Tighten knobs
and place a square (H, Fig. 5) against the
table and sander disc. The square should
rest flat against the table and the disc.
2. If adjustment is needed move the table so
that it rests 90 degrees from the table, and
loosen the hex nut (I, Fig. 5) and tighten the
set screw (J, Fig. 5) until it contacts the
table surface. Tighten hex nut. This will
properly adjust the 90-degree stop.
3. Loosen knobs (G Fig. 5) and tilt table up
enough to pivot the stop (K, Fig. 5) out of
the way.
4. Tilt the table down until it hits the 45-degree
stop (L, Fig. 5). Tighten the lock knobs, and
check the table with a combination square.
5. If adjustments needed, loosen hex nut (M,
Fig. 5) and adjust socket head screw (L, Fig.
5) until it contacts table. Tighten hex nut.
6. Always maintain a gap of approximately
1/16” between the table edge, and disc. If
adjustment is necessary loosen hex cap
bolts (N, Fig. 6) and move the table into
position. Tighten hex cap bolts.
7. The table can be tilted between 15° up - 45°
down by loosening lock knobs and tilting the
table to the desired angle. Tighten knobs.
8. If you want to tilt the table up you need to
pivot the stop (E, Fig. 5) out of the way.