


9
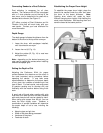
Conveyor Belt Tracking
Belt tracking adjustment may be necessary during
break-in period to compensate for belt stretching.
Abrasive belt tension must be properly adjusted
before adjusting the tracking. Adjust the belt
tracking while conveyor belt is running at its fastest
speed.
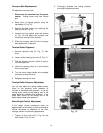
Tighten hex nut (A, Fig. 3) on the side the belt is
drifting towards, and loosen hex nut on the opposite
side. Use the attached wrench (B, Fig. 3) to
adjust the hex nuts. Note: Adjustment should be
made in 1/4 turns of the hex nut. Allow time for the
belt to react to the adjustment. Do not over adjust.
Dust Cover
To open dust cover push in on the knob (C, Fig
3) and lift.
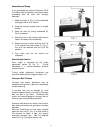
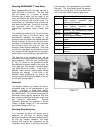
Checking Drum Alignment
The sanding drum comes preset from the
factory. If a problem with drum alignment occurs
follow the below listed instructions.
1. Push in and lift knob (C, Fig. 3) to open
cover and remove abrasive strip. If you are
unsure how to do this see the “Wrapping
Abrasive Strips” section page 10.
2. Use a metal straight edge, or ruler as a
thickness gauge (D, Fig. 4). Insert the
gauge between the drum and conveyor bed
on outer end of drum.
3. Open dust cover and lower sanding drum
while slowly rotating drum by hand until the
drum lightly contacts the thickness gauge.
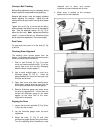
4. Remove thickness gauge and place under
the drum at opposite end. If drum does not
contact the thickness gauge to the same
degree as the other end of the drum,
alignment is necessary.
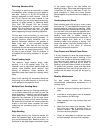
Aligning the Drum
1. Loosen the four hex cap bolts (E, Fig. 5) two
in front and two in back.
2. Lay the thickness gauge under the drum
lengthwise.
3. Adjust the knob, (F, Fig. 5) until drum
contacts the gauge equally along its surface.
Turn the adjusting knob clockwise to raise
outboard end of drum, and counter-
clockwise to lower outboard end of drum.
4. When drum is parallel to the conveyor
tighten the four hex cap bolts.