


16
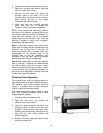
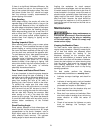
3. Loosen the conve
y
or take-up screw nuts
(
A,
Figure 20) to relieve belt tension, and slide
the driven roller fully inward.
4. Remove the four bolts that attach the
conveyor table to the base. Lift up the
conveyor table and remove it from machine.
Avoid tearing the belt on any edges
underneath the conveyor bed.
5. Install new belt, and re-install conveyor
table. Take care not to damage the
Trackers. Tension and track the new belt.
NOTE: If the conveyor belt continually tracks to
one side of the machine, reversing the belt on
the conveyor bed may remedy the problem. To
make sure the conveyor bed is not twisted,
place a level on the conveyor bed. Level the
machine if needed. If there is still a problem,
proceed with the steps below:
Step 1: Check the conveyor drive roller and the
driven roller to make sure they are parallel to the
surface of the conveyor bed. To do this, first
center the conveyor belt on the bed. Then lay a
straight-edge on the exposed edge of the
conveyor bed on the left (outboard) side,
extending it over the roller. Note the distance
between the roller and the straightedge.
Step 2: Now repeat Step 1 on the right (inboard)
side of conveyor. Compare the measurements
from side to side. If they are not equal, loosen
one of the brackets that hold the roller in place.
Tip this bracket until the distance between the
roller and the straight-edge are equal from side
to side, then tighten the bracket.
Checking Drum Alignment
The sanding drum must be aligned parallel to
the conveyor bed for proper machine operation.
The sanding drum comes preset from the
factory. If a problem with the drum alignment
occurs, follow the instructions below.
First inspect the alignment with a gauge of some
kind. The following procedure uses a steel
straight edge as a gauge.
1. Unplug sander from power source.
2. Open the dust cover and remove the
abrasive strip from the drum.
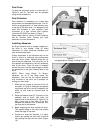
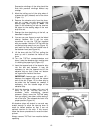
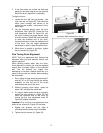
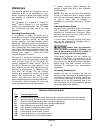
3. Insert the gauge between the drum and
conveyor bed at the outer end of the drum
(Figure 21). With the dust cover open, lower
sanding drum while slowly rotating drum by
hand until the drum lightly contacts the
thickness gauge.
4. Remove thickness gauge and place under
drum at the other end.
Figure 21