


22
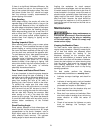
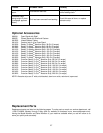
Tracker Kit (98-0080)
Trackers dramatically reduce tracking adjust-
ments of conveyor belts. They are already
installed on your sander. The following
information is for re-setting or replacing your
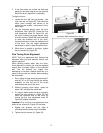
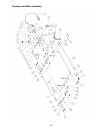
trackers, should that become necessary. Refer
to Figure 28.
1. Disconnect power to sander, and disconnect
motor cord from control box receptacle.
2. Lower conveyor table as far as it will go.
3. Loosen the conveyor take-up screw nuts to
relieve conveyor belt tension and slide
driven roller fully inward. Slide conveyor belt
to one side of bed.
4. Remove the four bolts holding the conveyor
table to the sander base.
5. Lift conveyor table and slide it out of the
sander. Turn conveyor table upside down.
Be careful not to damage the conveyor belt.
6. On the underside of the conveyor bed, there
are U-channels welded to the bed. The
Tracker is positioned on the inside of the
first U-channel on the infeed side of sander
(the U-channel closest to the rubber covered
drive roller and gear motor). The back of the
Tracker is magnetized and will stick to the
side wall of the conveyor bed. Do not install
Tracker if the edge of the conveyor belt is
damaged or torn.
7. With the first Tracker installed, slide the
conveyor belt into the bottom slot of the
Tracker. Note: When installed properly, only
the bottom lip of the Tracker will be visible.
The top slot is to be used if the bottom slot
wears out.
8. Install second Tracker opposite the first. Use
both Trackers unless the second one does
not fit in conveyor or if conveyor belt is
damaged.
9. Turn conveyor table right-side up and re-
position it onto the sander. Re-attach the
four mounting bolts and tighten. Caution:
Be careful not to knock Tracker(s) out of
conveyor bed when turning conveyor over.
10. Make sure all switches are off. Connect
power to sander and plug in motor.
11. Tension the conveyor belt using take-up
screw nuts. If both Trackers are installed, it
is very important to have equal tension on
both sides of the conveyor belt. Tighten both
sides of take-up screw nuts until equal
tension is obtained.
12. To check tension, turn on conveyor full
speed and place both hands on conveyor. If
conveyor belt can be stopped, continue
tensioning until conveyor belt cannot be
stopped by both hands on the belt while the
conveyor is operating at full speed.
13. Make sure conveyor belt runs smoothly
inside Tracker slot and that the magnet is
holding the Tracker in position.
14. Continue to watch tracking of conveyor and
adjust only if necessary, making sure to
keep equal tension on conveyor belt at all
times and not allowing conveyor belt to
buckle under conveyor bed.
Figure 28 (underside of conveyor shown)