


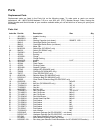
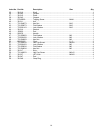

8
Assembly
The dust collector must be
disconnected from the power
source during assembly. Failure to comply may
result in serious injury!
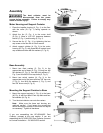
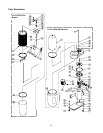
Motor Housing and Support Canister
1. Place the impeller housing (A, Fig. 1) on the floor
with the motor (B, Fig. 1) facing upwards as
shown.
2. Attach the fan (C, Fig. 1) to the motor shaft
(D, Fig. 1). Allow a 1/16"-1/8" clearance between
the fan (C, Fig. 1) and housing (E, Fig. 1).
3. Secure the fan (C, Fig. 1) by tightening the hex
cap screw on the fan with a 10mm wrench.
4. Attach support cylinder (A, Fig. 2) to the motor
housing (B, Fig. 2) with three M6x16 socket head
cap screws and three M6 flat washers (C, Fig. 2).
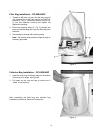
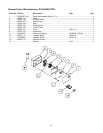
Base Assembly
1. Mount two fixed casters (C, Fig. 3) to the
appropriate end of base (D, Fig. 3) using four M6
flat washers (E, Fig. 3), four M6 lock washers (F,
Fig. 3) and four M6x12 hex cap bolts (G, Fig. 3).
2. Mount two swivel casters (H, Fig 3) to the
appropriate end of the base with two 3/8” hex nuts
(I, Fig. 3), four M10 flat washers (J, Fig. 3), and
two 3/8” acorn nuts (K, Fig. 3).
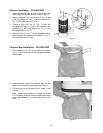
Mounting the Support Canister to Base
1. Mount the support canister (L, Fig. 4) to the base
(M, Fig. 4) with four M8x12 hex cap bolts and four
flat washers (N, Fig. 4).
2. Turn the dust collector over onto the casters.
Note: Make sure the base and housing are
relatively parallel. If not loosen the screws that
secure the support cylinder to the motor and adjust
as necessary. Tighten all hardware.
If you are assembling the DC-650A/ARC Dust
Collector, proceed to the next section. If you are
assembling the DC-650C/CRC Dust Collector, proceed
to Canister Installation – DC-650C/CRC section.
Figure 1
Figure 2
Figure 3
Figure 4