


7
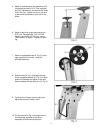
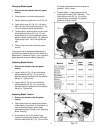
11. Slide pulley cover (A, Fig. 5) around motor
shaft and worm gear shaft. Secure with two
hex cap screws and washers (B, Fig. 5).
12. Lift motor with one hand while the other
hand places V-belt (C, Fig.5) on both pulleys.
13. Attach the tension bracket (D, Fig. 5) to the
saw bow with one 5/16”x3/4” hex head bolt
and flat washer (E, Fig. 5).
14. Connect the two tension brackets with one
5/16”x3/4” carriage bolt, one 5/16” flat
washers and one 5/16” hex nut (F, Fig. 5).
Hint: Insert the carriage bolt from the inside
so the hex nut is easy to access with a
wrench.
15. Tension belt by pressing down on the motor
while tightening hex nut (F, Fig. 5) until
finger pressure on the belt between the two
pulleys causes approximately 1/2" deflection.
Close pulley cover. Don’t over tighten the
belt.
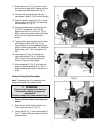
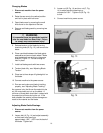
16. Insert stop rod (A, Fig. 6) into bed and
tighten set screw (B, Fig. 6). Slide stock
stop (C, Fig. 6) onto rod and tighten set
screw (D, Fig. 6) to hold in place.
17. Slide handwheel (E, Fig. 6) onto shaft and
secure by tightening set screw (F, Fig. 6).
Make sure set screw seats on flat portion of
shaft.
Vertical Cutting Plate Assembly
Note: These steps are only necessary when
using the bandsaw in the vertical mode.
WARNING
Disconnect the bandsaw from the power
source before making any repairs or
adjustments!
Failure to comply may cause serious injury!
1. Disconnect the bandsaw from the power
source.
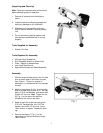
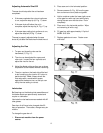
2. Raise the arm to the vertical position and
lock in place with lever (A, Fig. 7).
3. Loosen bolt (B, Fig. 7) and insert bracket (C,
Fig. 7). Tighten bolt just enough to hold the
bracket in place.