10
Replacing Sanding Sleeves
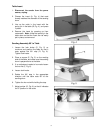
1. Loosen hex nut (A, Fig. 7) with a 26mm
wrench, or large adjustable wrench.
2. Slide the sanding sleeve (B, Fig. 7) off the
drum and replace with a new sanding
sleeve. Note: If the sanding sleeve is not
easily removed cut the sleeve off and clean
the drum before reinstalling a new sleeve.
3. If you are replacing the sanding sleeves on
the steel spindles loosen the set screw
found on the arbor nut.
4. Remove sanding sleeve from the spindle
and replace with a new sanding sleeve.
Note: If the sanding sleeve is not easily
removed cut the sleeve off and clean the
drum before reinstalling a new sleeve.
5. Tighten the set screw.
Dust Collection
In order to collect wood dust; attach a dust
collection hose to the dust port. JET has a
variety of dust collectors, air filtration units,
hoses and adaptors, etc. that will work nicely
with your new sander. Contact your local JET
Distributor for more information.
Maintenance
The manufacturer recommends replacing the 90
SAE gear lube at 800 hours of use.
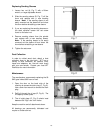
1. Open the door on the back side of the
machine to access the drain plug (C, Fig. 8).
Use a 6mm hex wrench to remove the drain
plug.
2. Refill oil through the oil cap (D, Fig. 9). The
oil capacity is two quarts.
3. The oil sight glass (E, Fig. 8) should read
between the “high” and “low” marks.
Keep the machine and all attachments clean.
All bearings are permanently lubricated and
require no further service.


