


11
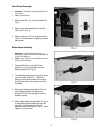
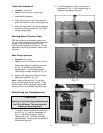
Table Insert Adjustment
• Hardware: Table Insert
• Tools: 3mm Hex Wrench, Straight Edge
1. Lower blade completely.
2. Place the open end of the insert under the
splitter and lower the insert into the opening.
3. Adjust the table insert flush with the table by
turning four leveling screws (A, Fig. 9) and
using a straight edge.
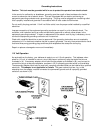
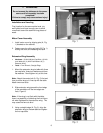
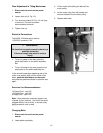
Mounting Rails & Extension Table
With the extension wing properly aligned, the
rail and fence assembly can now be mounted to
the saw. See the Owner’s Manual for the
XACTA Fence Assembly Instructions. This will
address the mounting of the table, switch, rails
and fence.
Miter Gauge Operation
• Hardware: Miter Gauge
• Tools: Cross Point Screwdriver, 8mm Wrench
1. Adjust miter gauge by loosening lock knob
(A, Fig. 10) and turning miter body to
desired angle. To move gauge beyond
index stops, flip down the stop (B, Fig. 10).
2. Adjust index stops by turning one of three
adjustment screws (C, Fig. 10).
Note: Always make test cuts. Do not relay
solely on miter gauge indicator marks. There
are two holes in the miter gauge body that will
allow you to mount an wooden extension face.
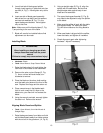
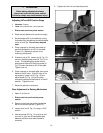
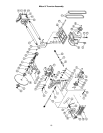
Blade Raising and Tilting Mechanism
CAUTION
Never try to force the tilting mechanism past
the 45°
°°
° or 90°
°°
° stops! This may cause the
blade to go out of alignment!
1. To raise or lower the saw blade, loosen lock
knob (A, Fig. 11), and turn handwheel (B,
Fig. 11) until desired height is reached.
Tighten lock knob. The blade should be
adjusted about 1/8" above the top surface of
the material being cut.
2. To tilt the saw blade, loosen lock knob, turn
handwheel (C, Fig. 11) until desired angle is
obtained, then tighten lock knob.