


8
WARNING
Do not connect the table saw to the power
source until all assembly has been
completed!
Failure to comply may cause serious injury!
Installation and Leveling
Final location for the saw must be level, dry,
well lighted, and have enough room to allow
movement around the saw with long pieces of
wood.
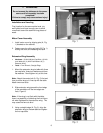
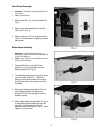
Motor Cover Assembly
1. Install motor cover by aligning pins (A, Fig.
1) brackets on the cabinet.
2. Fasten cover by pulling out latch (B, Fig. 1),
closing the door, and releasing the latch.
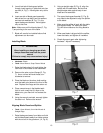
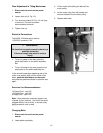
Extension Wing Assembly
• Hardware: (3) M10x30 Hex Cap Bolts, (3) M10
Lock Washers, (3) M10 Flat Washers & (1)
Extension Wing
• Tools: 17mm Wrench, Straight Edge
1. Mount the extension wing to table with three
hex cap bolts, three lock washers and three
flat washers. Hand tighten only at this time.
Note: Attach the center bolt (A, Fig. 2) first and
then pivot the wing so it lines up with the table.
Attach two more bolts.
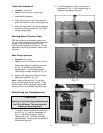
2. Slide extension wing toward the front edge
of the saw table until the two edges are
flush, Figure 3.
Note: If the wing is not flush with the table,
there is a possibility of distorting the front fence
rail when tightened to the extension wing. This
may cause the fence to bind.
3. Using a straight edge (A, Fig. 3), align the
extension wing to the saw table and tighten
the hex cap bolts.