


12
WARNING
When making adjustments always
disconnect saw from the power source!
Failure to comply may cause serious injury!
Adjusting 45°
°°
° and 90°
°°
° Positive Stops
• Hardware: Square
• Tools: 3mm Hex Wrench, 10mm Wrench
1. Disconnect saw from power source.
2. Raise the saw blade to its maximum height.
3. Set the blade at 90° to the table by turning
the blade tilting handwheel counterclockwise
as far as it will go. Do not force beyond
stop.
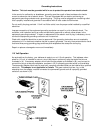
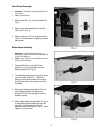
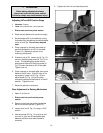
4. Place a square on the table and check to
see that the blade is at a 90° to the table,
(Figure 12). Make sure square is not
touching a blade tooth.
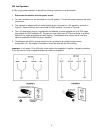
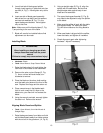
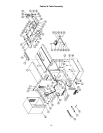
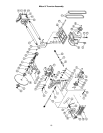
5. If blade is not at 90°, loosen nut (A, Fig. 13)
and turn adjusting stop screw (B, Fig. 13) in,
or out. The adjusting stop screw should
stop against the end of the tilting screw (C,
Fig. 13) when the blade is 90° to the table.
Tighten lock nut.
6. Place a square on the table after turning the
blade to the 45° stop. If the 45° stop is not
set properly, loosen nut (E, Fig. 13) and
adjust screw (D, Fig. 13) until the stop
touches the table and the blade is in the 45°
position. Tighten the nut
7. Adjust the pointer for accuracy.
Wear Adjustment in Raising Mechanism
• Tool: 15/16” Wrench
1. Disconnect the saw from the power
source.
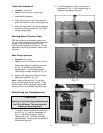
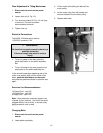
2. Remove lock knob and raising handwheel
but do not remove pointer, (Figure 14).
3. Loosen lock nut (A, Fig. 14) using a 15/16"
wrench.
4. Use the pointer (B, Fig. 14) as a lever and
turn left, or right until all perceptible play
between the worm and arbor bracket is
removed.
5. Tighten the lock nut and reset the pointer.