


This machine can be used to cut building materials of
various shapes and profiles from metal that are then used in
workshops and turning shops, and mechanical construction
in general. We strongly advise against using it for any other
purposes.
The saw band teeth must be appropriate to the thickness of
the item being processed (see chapter Choosing the saw
band).
The lighting must be 300 LUX to ensure safe working.
ADJUSTING THE SAW BAND GUIDE BEARINGS
The back of the saw band must lie on the top guide bearing,
while the saw band is fed between the two guide bearings.
To adjust the left-hand guide, release the rear screw of the
eccentric. Now use the eccentric to adjust the guide bearing
on the saw band. Tighten the screw again. The guide
bearings on the right are adjusted in the same way, the only
exception being that the adjustable guide element is at the
front in this case. Note that the play between the saw band
and the guide elements must not exceed 0.05 mm.
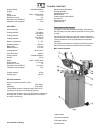
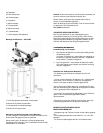
MACHINE VICE
Position the workpiece in the vice with the end being
processed protruding over the saw band. The movable vice
jaw is adjusted by the lever. To insert the workpiece, move
the vice and clamp lever to a distance of 2 mm from the
workpiece. Turn the quick change lever to clamp the
workpiece in the vice. Move the adjustable left-hand band
guide head as close as possible to the workpiece.
Turn the band clamp handwheel to the end position.
7 Commissioning
NOTE
In the event of faulty operation or danger, the machine
can be stopped immediately by pressing the red knob.
1. Check the saw band tension.
2. Turn the quick change lever to clamp the workpiece in the
vice.
3. Move the adjustable band guide head as close as possible
to the workpiece.
4. Switch the machine on by first pressing the “ON” button
and then pressing the push switch on the handle.
5. The lifetime of the saw band can be extended significantly
by lubricating it with stick wax item no. 100103.
6. After finishing the cut, the machine is stopped by releasing
the press switch on the handle.
SWITCHING THE -815DV ON/OFF
To switch the machine on, raise the saw arm. First press the
“ON” button, and then press the press switch on the handle.
The machine switches off when you either release the press
switch on the handle or push the stop button. The rotations
are adjusted continuously by turning the speed selector
switch.
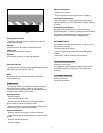
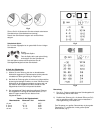
ADJUSTING THE COURSE OF THE SAW BAND
The course of the saw band is correct if the back of the saw
band touches the sides of the two flywheels. If this is not the
case, then release/tighten the flywheel screw until the saw
band runs centrally.
ADJUSTING THE SAW BAND GUIDE BEARINGS
The band guides must be set as close as possible to the vice
jaws. The right-hand band guide head is fixed in position,
while the left-hand one follows the movements of the vice
jaw. In order to adjust the position of the left-hand band
guide head, release the tensioning handle. Tighten the
tensioning handle again after making the adjustment.
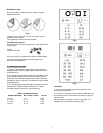
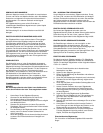
REPLACING THE SAW BAND
The machine is supplied with a saw band. Please observe
the following table for saw bands with the optimum toothing.
You require saw bands of the following measurements: 1735
x 13 x 0.64mm.
1. Disconnect the machine by pulling the socket out of the
mains network.
2. Raise the saw arm all the way up.
3. Open the cover of the wheels and remove the sawdust.
4. Release the band clamp handwheel (turn to the left).
5. Push the left-hand saw arm guide as far to the right as
possible.
6. Remove the band from the two flywheels and the band
guides.
7. When inserting the new saw band, make sure that it is
inserted in the cutting direction of the teeth (toothing in the
direction of the arrow on the saw arm.)
8. Place the new saw blade on the band wheels.
9. Slide the saw band all the way along the guide bearings
to the top. The back of the band must touch the rear guide
bearing.
10. Tighten the band slightly and move it along the band
wheels.
11. Check that the band is correctly positioned in the guides
and the back correctly positioned on the wheel stops, and
tighten the saw band.
12. Switch the machine on for a short test run. If the saw
band does not run centrally, read the chapter “Adjusting the
course of the saw band”.
7