


Cordless Circular Saw Operator's Manual 23
Operation
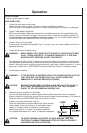
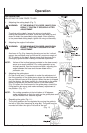
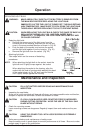
REPLACING LIGHT BULB
1. Detaching light bulb:
a. Remove the convex part of the light cover from the
concave part of the housing, and then pull out the light
cover in the arrow-marked direction as shown in Fig. 20.
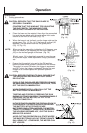
b. Push the back of the socket, and remove the socket
and the light bulb together from the housing. (Fig. 21)
c. Remove the light bulb from the socket. (Fig. 22)
2. Attaching light bulb:
Take steps which are the reverse of detaching
procedures.
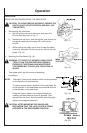
NOTE: When attaching the light bulb to the socket, insert the
light bulb until it lightly bumps against the socket.
When attaching the socket to the housing, align the
socket with the hole of housing while watching the back
of the socket shown in Fig. 22, and insert the socket
until it lightly bumps against the housing.
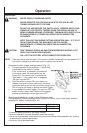
WARNING: MAKE ABSOLUTELY SURE THAT THE BATTERY IS REMOVED FROM
THE MAIN BODY BEFORE REPLACING THE LIGHT BULB.
IMMEDIATELY AFTER THE LIGHT IS TURNED OFF, THE BULB RETAINS
HIGH TEMPERATURE. MAKE SURE TO COOL DOWN THE LIGHT BULB
THOROUGHLY BEFORE REPLACING IT SO AS TO PREVENT BURNS.
CAUTION: WHEN REPLACING THE LIGHT BULB, CHECK THE SHAPE OF BASE AS
WELL AS THE RATING (12 V, 5 W), AND THEN INSERT BULB
COMPLETELY. OTHERWISE, THE LIGHT BULB CAN COME OFF AND/
OR CAUSE OVERHEAT.
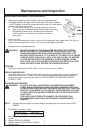
MAINTENANCE AND INSPECTION:
CAUTION: PULL OUT BATTERY BEFORE DOING ANY MAINTENANCE AND
INSPECTION.
1. Inspecting the saw blade:
Since use of a dull saw blade will degrade efficiency and cause possible motor malfunction,
sharpen or replace the saw blade as soon as abrasion is noted.
CAUTION: IF A DULL SAW BLADE IS USED, REACTIVE FORCE IS INCREASED
DURING CUTTING OPERATION. AVOID THE USE OF THE DULL SAW
BLADE WITHOUT REPAIR.
2. Check the mounting screws:
Loose mounting screws are dangerous. Regularly inspect them and make sure they are
tight.
CAUTION: USING THIS POWER TOOL WITH LOOSE SCREWS IS EXTREMELY
DANGEROUS.
3. Performance checkup and maintenance of safety cover:
Keep the safety cover in good shape for smooth performance at all times. Be sure to make
prompt repair in case of any malfunction.
Maintenance and Inspection
(Fig. 21)
(Fig. 22)