


- 6
Caution
Do not completely deplete the fuel in the
fuel tank, otherwise, the fuel system will
have to be ventilated. Possibly suctioned
dirt from the bottom of the tank can lead to
malfunctions.
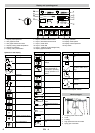
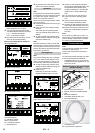
Î Check the fill level of the diesel fuel at
the bar segment display for the fuel lev-
el. If required, top off the diesel fuel.
For temperatures below 0°, only use
winter diesel.
Î Check the fill level of the water at the
bar segment display for the water level
in the tank. Top off the water tank if nec-
essary. Connect the water supply hose
to the water inlet.
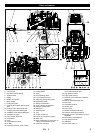
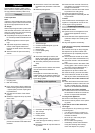
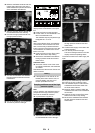
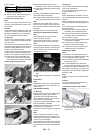
1 Trigger gun
2 Pressure ring
3 Pressure screw
4 Spray lance
5 Nozzle holder
6 High pressure nozzle
Î Remove the protective caps on the
spray pipe.
Î Grease the thread on the gun side with
stainless steel screw grease (6.280-
180.0).
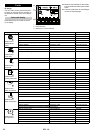
Î Screw the pressure ring onto the spray
pipe.
Î The sealing cone of the spray pipe must
protrude about 1-1.5 thread lengths (B)
from the pressure ring (A).
Î Rotate the pressure ring (A) by hand to
adjust the distance (left thread).
Î Insert the spray pipe all the way into the
gun.
Î
Secure the spray pipe by tightening the
pressure screw (torque approx. 100 Nm).
Do not perform this procedure until after the
unit has been ventilated, see "Ventilating
the high pressure system“.
Î Grease the thread on the nozzle side
with stainless steel screw grease
(6.280-180.0).
Î Grease the nozzle holder with stainless
steel screw grease (6.280-180.0) and
screw it onto the spray pipe (left
thread).
Î Grease the thread of the high pressure
nozzle with stainless steel screw
grease (6.280-180.0) and screw it onto
the nozzle holder (hexagon socket).
ƽ Danger
Risk of injury from leaks or water jets
emerging from leaks.
– Hoses, pipes and the spray unit must
be in good condition and installed prop-
erly.
– Check the high pressure hose daily.
– Only use original high pressure hoses
that are approved for the respective
pressure range and temperature.
– Avoid contact with chemicals.
– Do not use hoses with kinks.
– Do not use the high pressure hose any-
more if the thread is damaged or cor-
roded.
– Stop using the high pressure hose if the
external wire layer is visible.
– Do not route the high pressure hose
across sharp edges.
– Lay the high pressure hoses in such a
way that no vehicle can drive over it.
– Do not use high-pressure hoses that
have been driven over, kinked, pressed
or bent even if there is no externally vis-
ible damage.
– Completely lay out the high pressure
hose, do not overlap.
–
High pressure hoses age with time. Re-
place high pressure hoses every 6
years, even if they are in good condition.
– High pressure hoses that have been
stored for more than 2 years, may no
longer be used.
– Store the high pressure hose so that
there is no mechanical strain. Store in a
cool, dry and dustfree place.
– Do not stretch the high pressure hose
during storage, as the high pressure
hose might change its length during op-
eration.
– Relieve tension from the high pressure
hose after operation, purge excess wa-
ter, coil it and store it properly.
Î Unscrew the protective caps from the
high pressure connection of the hand
spray gun and pull off at the high pres-
sure hose.
Î Clean the thread and grease it with
stainless steel screw grease (6.280-
180.0).
Î Check the high pressure hose for flaw-
less condition (no damage). Only use
intact hoses.
Î Connect the high pressure hose to the
hand spray gun (procedure as de-
scribed in Chapter "Connecting the
spray pipe to the gun").
Î Remove the protective cap from the
high pressure outlet of the appliance.
Î Clean the thread and grease it with
stainless steel screw grease (6.280-
180.0).
Î Connect the high pressure hose to high
pressure connection (procedure as de-
scribed in Chapter "Connecting the
spray pipe to the gun").
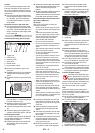
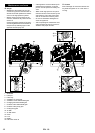
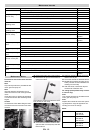
1 Hose sock mounting
2 Hose sock
Î When using a hose sock to protect the
high pressure hose from ripping off,
hook the hose sock into the hose sock
mount.
Î Roll the control line off the winch to
hose length. Make sure that the control
line is not underneath the high pressure
hose, as the high pressure hose can
rub against it and cause a line break.
Î Pull of the protective cap or antifreeze
plug on the appliance connection side.
Î Connect the short cable end of the
winch with the socket.
Î
Plug the protective caps together to pre-
vent soiling of the protective cap insides.
Î Connect the control line on the gun side
and plug the protective caps together.
According to the applicable regu-
lations, the appliance must never
be used on the drinking water net
without a system separator. Use a
suitable system separator manufactured by
Kärcher; or, as an alternative, a system
separator as per EN 12729 Type BA.
Note
Water with drinking water quality with a
pressure between 0.15 and 0.6 MPa (1.5 to
6 bar) is required to ensure a smooth oper-
ation of the system.
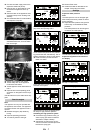
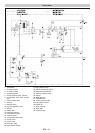
Î Remove the protective cap from the wa-
ter supply inlet of the appliance.
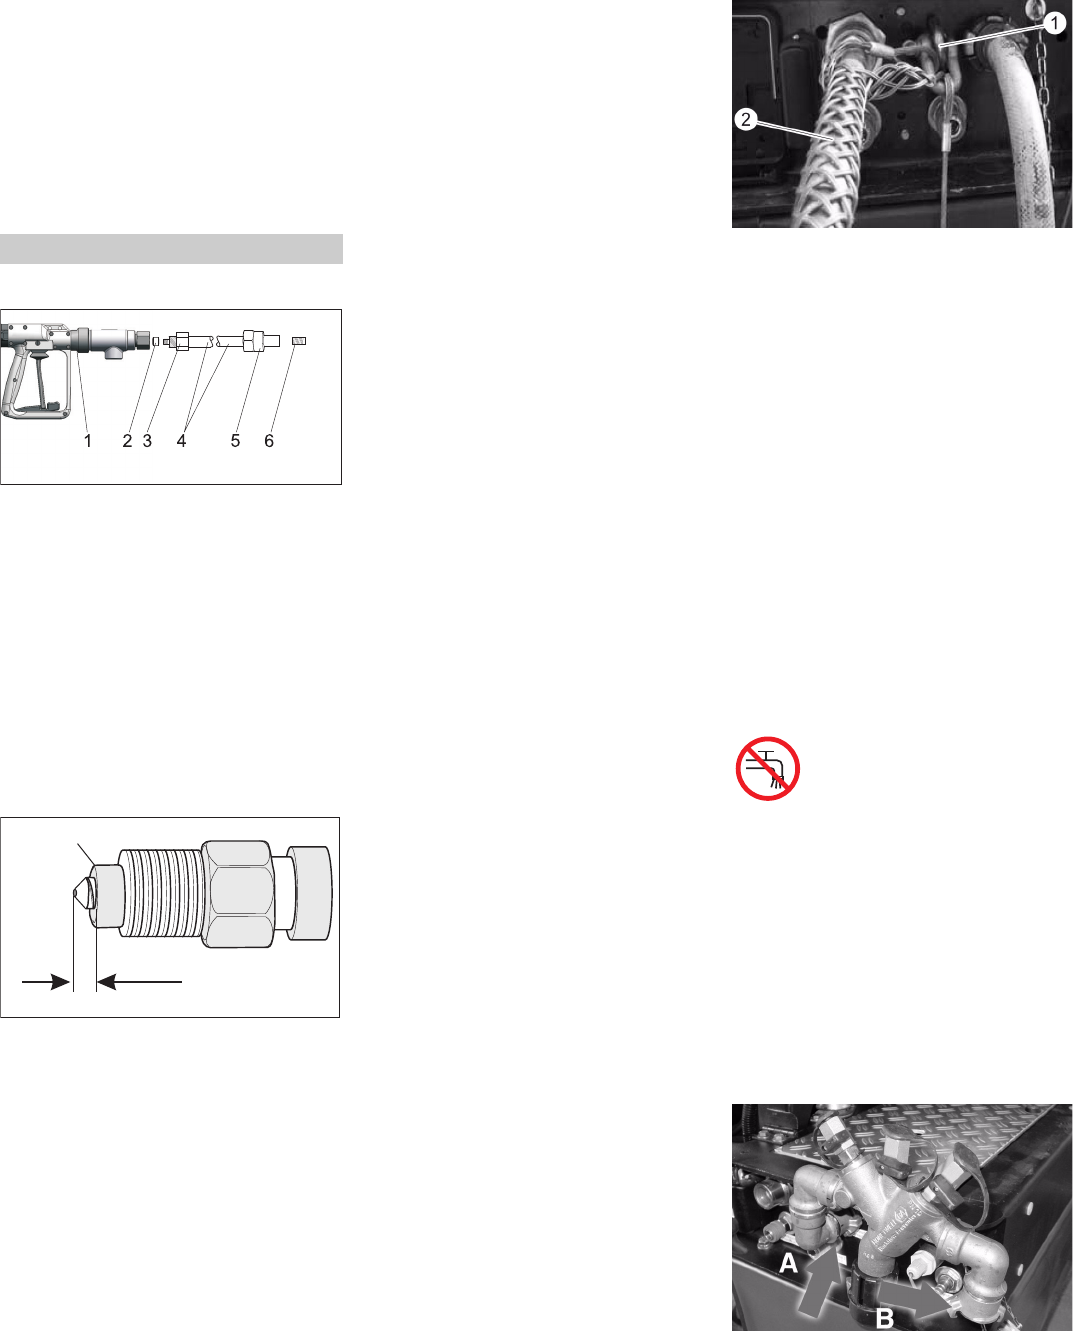
Î Connect the system separator to the
water inlet (option).
A If the system separator was installed,
the water inlet is on the appliance
B Water inlet on the system separator
Check the fill level in the water tank
Start up
Connecting the spray pipe to the gun
Connecting the nozzle
B
A
Connect the high pressure hose to the
gun and the appliance.
Connect the control line
Connect the water supply
8 EN