


D-3
MAINTENANCE
D-3
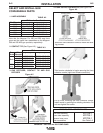
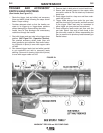
GUN TUBE REPLACEMENT
• Replace if worn from use; for example, if gas diffuser
threads are deforming.
1. Remove consumables per this section, Gas
Diffuser Replacement.
2. Remove swivel assembly at rear of handle (ccw,
right-hand threads), remove fume tubeʼs locking
collar from handle, and remove left side of handle.
3. Use snap ring pliers to remove both spiders from
the old gun tube. Use hammer and drift to remove
the gun tube lock from the old gun tube.
4. Obtain a new replacement gun tube.
5. Install spiders and gun tube lock onto the new gun
tube.
6. Install new gun tube to the gun end of the gun
cable. Tighten gun tube to gun cable with 10 to 12
ft.-lbs. of torque.
7. Reassemble gun. Route the control leads inside of
gun handle per this section, Trigger and
Accessory Switch Lead Routing. Be careful not
to pinch any leads between gun handle halves.
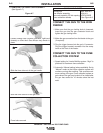
TRIGGER ASSEMBLY
REPLACEMENT
• There are no serviceable or maintainable parts
inside of the trigger.
1. Remove swivel assembly at rear of handle (counter
clockwise, right-hand threads), remove fume tubeʼs
locking collar from handle, and remove left side of
handle.
2. Slide trigger out of right handle half. Disconnect red
and white leads from trigger. Use care to prevent
damage to electrical leads and the terminals.
3. Connect red and white leads to the new trigger.
Either lead may be connected to either trigger pin
(non-polarized connections).
4. Slide new trigger into place and reassemble the
gun. Be careful not to pinch any leads between gun
handle halves.
GUN CABLE ASSEMBLY
REPLACEMENT
• In general, the 350 and 550 gun cables have no ser-
viceable or maintainable parts. Here are the only
types of cable service that may be performed without
removing or replacing an entire gun cable:
• Replace both “o-rings” on the gunʼs power and gas
connector (see Table A.1, Installation Section).
• Repair the gunʼs four #19 AWG control leads by
splicing and soldering them back together, and then
reinsulating them with heat-shrink tubing. See Figure
A.3 Installation Section and Trigger Assembly
Replacement for a description of the connections.
• Otherwise, a damaged gun cable should be replaced
as follows:
1. Remove liner assembly per this section Liner
Assembly Cleaning or Replacement.
2. Remove gun tube assembly per this section Gun
Tube Replacement. Do not remove spiders or gun
tube lock.
3. Disconnect gun cableʼs red and white control leads
from trigger assembly.
4. Disconnect gun cableʼs blue and black control leads
from optional accessory switch (if so equipped).
5. Disassemble the Y connector halves as follows.
See Figure A.2 and A.4 Installation Section as a
guide:
• Disconnect the gunʼs Y connector from the
vacuum source.
• Use the Oetiker tool to remove the gunʼs
clamp from its vacuum hose.
• Slide the clamp and hose off of the Y con-
nectorʼs inlet.
• Remove the 2 screws from the Y connectorʼs
modular trigger terminal housing.
• Remove the 3 screws from the Y connector.
• Separate the Y connector halves.
• Remove the modular trigger terminal housing
halves and separate them.
MAGNUM™ PRO 350 and 550 FUME GUNS